When I get to the glue up phase of a project, I feel like I’m coming down the home stretch. By this point, I’ve usually made most of my cuts and have everything relatively complete. It’s the first opportunity to finally see my project coming together and nearing completion.
If you are like me, this excitement of nearing the end of the project can easily lead you to blow through the glue up phase and fail to give it the proper focus and attention that it needs. I have to constantly remind myself, this is a crucial step in the process. Cutting corners at this stage very well may lead to time consuming repairs or overall poor quality. Below is a list of tips that I’ve come up with that I hope will help make your glue up process easier and yield better results!
1) Use the correct glue (Part 1) – This may sound rather obvious, but I listed it as the first two tips on purpose. Using the wrong glue on a project can easily cause the project to turn in a disastrous waste of time. For a more detailed explanation on the different types of glue that are used in woodworking, please take a look at my article “What Is Woodworking Glue And How To Choose The Right One!”
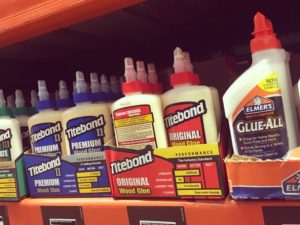 The first thing you need to pay attention to during glue up is whether or not the glue you are using needs to be water/moisture proof. If you choose a glue that is not water proof and place your piece outdoors or in a high moisture area like a bathroom, you are going to run into problems in a few months. The moisture will cause the glue to break down and lose its strength and bonding capabilities. An extreme example, but the wrong decision in this area could prove dangerous should you glue up an outdoor chair that sits around a fire pit. That’s why, I have this listed as #1.
2) Use the correct glue (Part 2) – The second part of using the correct glue is centered around saving you some frustration (and one I have much experience in) . Always make sure you are using a glue with a working time that fits your needs. The working time of glue is the amount of time you have to get your pieces setup before the glue begins hardening which will make adjustments difficult.
If you use a glue with a short working time, like super glue, you may only have a few seconds to get your pieces in place before it starts to dry. This doesn’t mean that you should discount ever using super glue as it has its advantages. One such example may be trim work on a piece that must be put in place before you can continue working. In this case, you may want the glue to dry quickly so you can continue assembling your piece.
It’s also important to not use a glue that has a significantly longer working time than what you need. There’s nothing much more frustrating to me than when I get my parts glue up and clamped only to come back 30 minutes later thinking I can continue working only to find out the glue is still wet. The working time of your specific glue should be very easy to find on the manufacturers website.
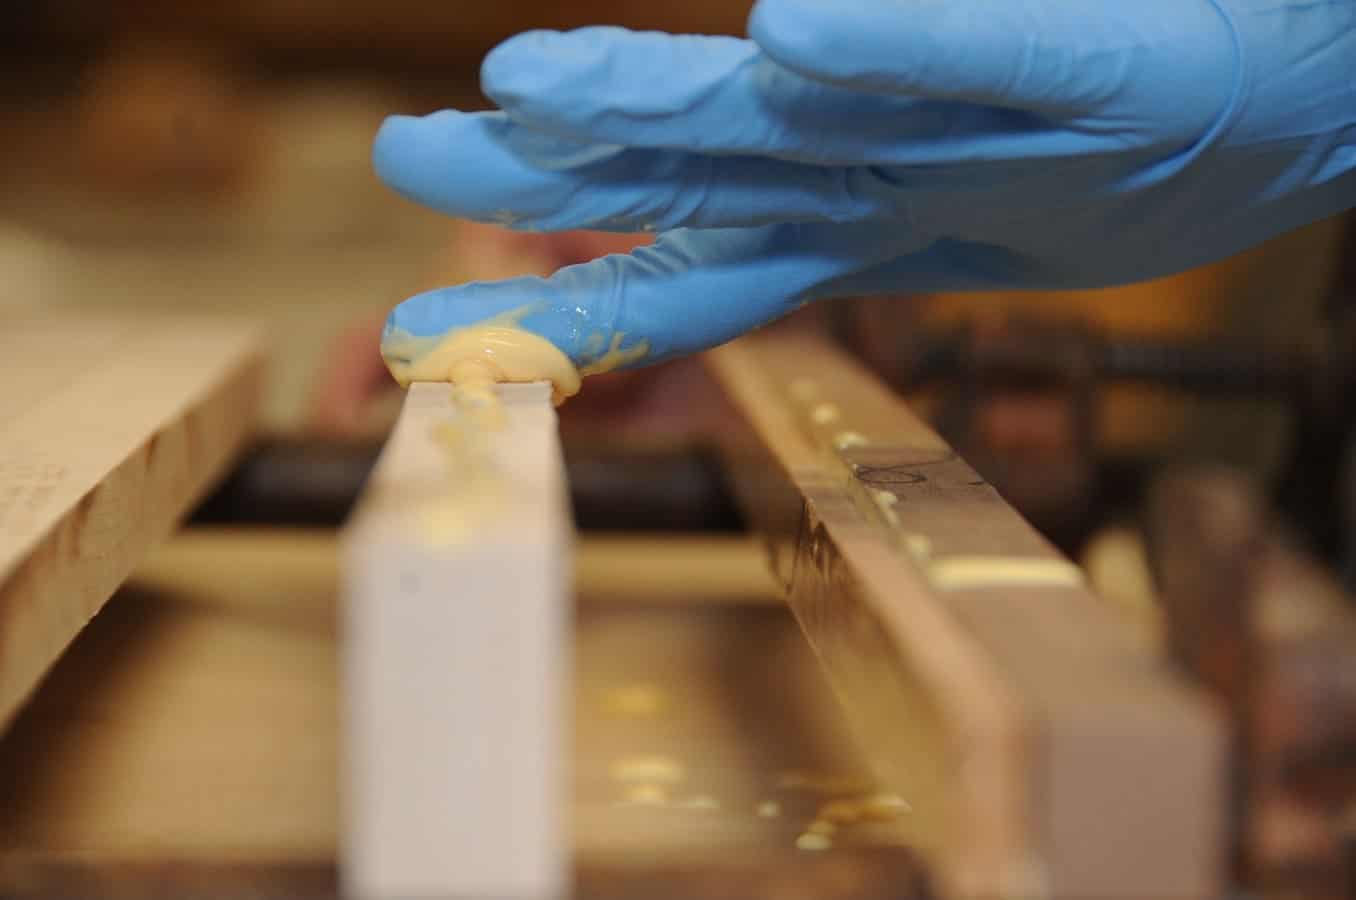
3) Test before glue – This is one that I have become a huge fan of over the years. When I first started out woodworking, I didn’t have the patience to do this step. I highly recommend piecing everything together as much as you can before gluing them up. Go ahead and clamp everything up as if you had already applied some glue. This will allow you to find any potential areas where your parts don’t line up correctly. Also, look for areas where glue may escape. This will allow you to be proactive at preventing seepage so you aren’t rushing to clean it up later when it could mess up your finish.
Another example of where this is beneficial is when it comes to gluing up multiple boards for a table top. As you are laying out your boards, you’ll want to pay attention that the grain and patterns in the wood are aligned like you want. You’ll also want to ensure the edge butt up properly to one another. This is much easier to do when you aren’t having to rush around due to your glue starting to dry.
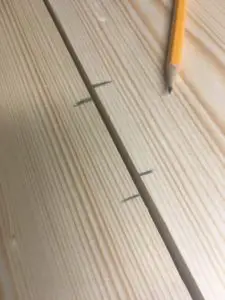 4) Remember your placements – Once you complete your test layouts, it’s important to remember exactly how they go back together. Especially given the fact that the next time you start piecing them back together, there will have glue on them. The markings don’t have to be large or anything special. I usually just make a pencil line across the joint onto both boards so I know exactly where they line up.
5) Use a glue spreader – You can make a glue spreader out of just about anything as long as it has some stiffness. I’ve seen people use old credit cards, scrap wood or even some cardboard. The purpose of using one is just to ensure you have complete glue coverage on your pieces. It also helps by evening out the glue so it’s not clumped together in certain spots. There’s a few glue bottles available at most hardwood stores that have a roller built into it. This allows you to spread the glue as it is being squeezed out of the bottle.
6) Start small and grow – You may be tempted to glue up all your pieces at once so that you can complete your project more quickly. I recommend that you take it slow. Once, I built a dining room table that was made up of several boards measuring about 42″ wide. I decided to glue the table all at once so it was done and over. It turned into a disaster. I learned that I should have taken my time and glue a couple of boards together at a time and let them set before adding the next row of boards. This allows the glue to dry and get up a firm bond while also allowing your clamps to provide a more consistent level of pressure through the entire board.
7) Use sandbags as needed – This was something I learned from my dad growing up. The pieces that you are gluing aren’t always clean and perfect squares. My dad created some small sandbags to use to hold down awkward pieces during the glue up phase. The bags conform to the shape of your project and help give it consistent pressure. Plus, they are small enough to store in a drawer when you aren’t using them. I’ve also heard of people using shotgun shell reloads in place of sand.
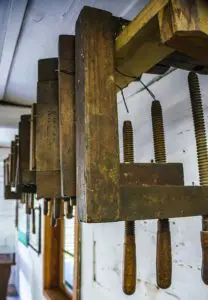 8) Watch for clamp marks – Many bar clamps today come with pads on the jaws. These pads help reduce the risk of your clamp leaving marks and dents on your wood. Typically, C-clamps and pipe clamps do NOT come with any padding. I recommend putting a piece of scrap wood or cloth between the clamp and the wood you are gluing to prevent damage.
9) Just enough pressure – The American mind frame is “more is better.” This saying should not apply to your glue up process! Many times, new woodworkers are uncertain about how much they should tighten their clamps so they tend to go overboard and over do it. The general rule of thumb is that if at any time you are modifying the shape of the wood in any way by tightening the clamps, you need to loosen it some. The goal of tightening your clamps should NOT be to tighten them as much as you can. Doing this will likely cause damage to the surface of your wood (see tip #8). The glue will do it’s job if you give the clamps good, solid, consistent pressure throughout the boards.
10) Use the correct types of clamps – There are many types of clamps on the market, which I’ve covered in this post. Using the correct clamps can be a serious deciding factor as to whether or not your glue up process is a frustration free success. Generally, the most common clamp used in a wood shop is a 2-3 foot bar clamp. These clamps should allow you to complete a majority of your work. Larger projects such as large table tops will require pipe clamps which can hand up to 7 or 8 feet of material.
However, what happens in the cases when you need to clamp small items, such as parts of a wood toy? In these cases, it’s likely that you will need to use small c-clamps or spring clamps. These come in handy for holding small fragile pieces in place. Another idea to consider is the use of clothes pins. These do excellent at holding very small pieces in place during the glue up process.
11) Use tape if needed – There are times when a clamp just won’t work. Perhaps a table you’ve created in the past is hit with something heavy on the edge and a small piece cracks or splinters off? Odds are, a clamp won’t hold the piece in the exact spot you need it. One option may be to use super glue as your quick curing adhesive but also use tape to hold the piece in place while it dries. Painter’s tape will do an excellent job by holding in place and is easy to remove afterwards without worrying whether it will damage your piece.
12) Even clamp application – Another important thing to keep in mind during glue up is ensuring even clamp coverage over your entire project. For instance, when gluing a table top together, it’s important to make sure the entire length of the board has clamps spaced evenly across the board. Otherwise you risk weak spots in the glue.
When applying the clamps, either start at one end and work your way towards the other; or start in the middle and work your way out. This will prevent open pockets from developing.
13) Tape a seam – Seeping glue can cause issues that aren’t visible until after you’ve applied your stain if you don’t clean it properly. It’s important to take every precaution you can to keep the glue from getting onto visible parts of your wood. Back to our example of a table top; its a good idea to run pieces of painter’s tape down the edges of each board. Then as your clamp the boards together, the glue that seeps out of the seam will dry on the painters tape and not your boards. Just be sure to press the tape firmly down when applying so no air bubbles are created.
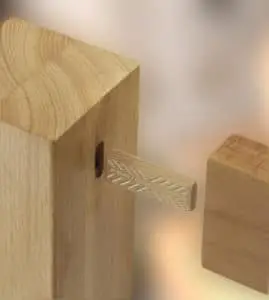 14) Use joining help – To ensure your boards line up properly and to add long term strength and stability, you may want to consider using additional joinery techniques along with the glue. These don’t have to be fancy and complicated joins like dovetails. Instead, you can use a “biscuit join” or a “dowel join.” Each as similar in how they function.
Basically, you would drill a hole (for a dowel) into the sides of each board at the same spot where you want the boards to come together. You would then apply glue inside the hole, and place the dowel into one hole. Next you would slowly slide the second board against first board so that the dowel enters the drilled hole. The glue will cause the dowel to expand, thus giving it additional strength when dry. It also helps keep your boards align during the clamping and gluing phase.
15) Protect your clamps – It’s almost certain that you are going to encounter glue dripping from your project during this phase. Even if you are careful not to over tighten your clamps, there will be glue to seep out. Make sure to protect your clamps from dripping glue. Laying wax paper between your clamps and your wood works well. You can also use old cloths or newspapers as long as you ensure they don’t dry touching your piece.
16) Try a rub join – One way to ensure you have a solid consistent glue coverage is to perform a rub join. This is very easy to perform. Simply put a thin layer of glue on each board that you are glue and then rub the two pieces of wood together back and board. This will spread the glue and work it into the wood itself.
17) Glue before staining – This may be the opposite of what you’ve done in the past, but I find it very effective. As I mentioned earlier, it’s almost certain that you will get some glue drips or runs after clamping your work together. If you wait to glue after you have stained all of your pieces, you may cause yourself extra work by having to repair your stain from the spot left by scraping off excess glue. The most common methods for removing excess glue is by scraping or sanding it away. If you do this after you’ve applied your finish, its very likely you’ll have to fix the stain by trying to blend it due to the damage caused during scraping or sanding.