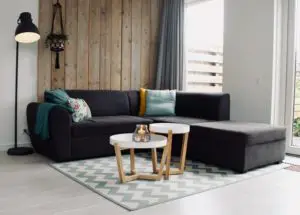
Using reclaimed wood for accent walls is becoming increasingly popular. Reclaimed wood not only provides a stellar aesthetic look, it is also serves as a great story for entertaining guests. The purpose of this article will serve as a guide for your project.
It will no doubt be a DIY project to remember! One that will not only feel incredible once you finish, but also look just as incredible. Done right, you are sure to wow your neighbors, friends, and family, and any other visitors you may have. There are five main steps to using reclaimed wood for an accent wall.
Step One: Choosing the Right Type of Wood
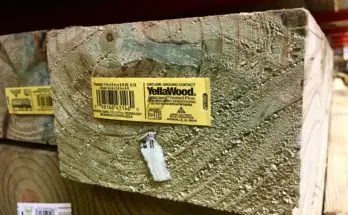
The wood you should chose depends on the finished look you have envisioned. If you are aiming for that antique farm house look then you should consider using lumber reclaimed from a structural wall of a barn or shed. These types of boards typically come in two colors – brown/tan or gray.
Wood pallets could also work well for a rustic look, and may be easier to find if you are in more urban area. Check with your local grocery store to see if they have any extra pallets they may be willing to sell, or even just give you. If you choose to go with pallet wood, you need to make sure the pallets you use are safe. I wrote an article explaining how to tell if a pallet is safe to use in this article.
If you’re after a more polished look, then considering using already finished lumber reclaimed from a solid floor. Maple and Oak would be a good choice for a modern look as they are typically more dense and solid. While this type of wood may be harder to find, it is often very structurally sound and can often already have a polished shine to it, allowing you to more easily touch up instead of re-staining. It might be worth contacting a reputable flooring company in your area to see if they have any wood you may be able to recycle for them.
There are also several international reclaimed wood companies where you can purchase all the wood you need for your project. Many of them offer shipping, but there may be a brick and motor store close enough to you that would make a trip worth while as shipping prices can be quite hefty.
Step Two: Inspect Wood to Make Sure it is Safe to Use
Re-purposing wood is an excellent way to be environmentally conscious, but you will make to sure the wood you use is both structurally safe, and insect free.
 Once you have found the source of wood, the next step is to closely examine it for any signs of environmental ware that might weaken its stability. The wood does not need to be perfect. Small cracks and splits are okay, but they need to be small enough that you can easily fill them in with wood epoxy.
You will also want to inspect any wood you use for soft spots and mold, as these are often signs of wood rot. Look closely at any divots to make sure they do not have any saw dust as this can be an indicator that termites have chewed through that board, compromising its internal integrity.
If you are re-purposing wood pallets or wood flooring, there is a good chance that the wood will already be in good shape and structurally sound. However, it is still a good idea to make sure there are no signs of termites or other insects.
You may have to discard a few boards here or there, but that is just a part of the process of repurposing wood. The older the wood, the higher the chance for terminates or weaker structural integrity. However, typically speaking, older wood boards can be some of the strongest you are able to find, as old lumber used to be harvested from harder trees such as pine and maple.
Check out my article here, where I explain the steps you can take to ensure your wood is bug free!
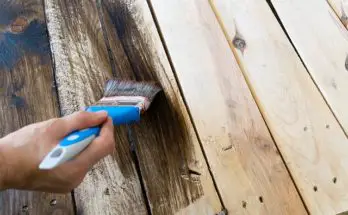
Step Three: Clean the Wood
Now that you have the wood you need for your project, you will need to make sure that it is clean. Start by scrubbing the boards with a hard bristle or steel brush to knock off any loose dirt and grime.
Next, scrub your boards down with water and cleaning solution to get them nice and clean and ready for primer, paint, or install. It is best to stay away from cleaners with high levels of toxicity such as bleach or Windex. All purpose cleaning formulas such as Borax, or even vinegar are a safer bet.
*Quick and dirty tip– stop by your favorite restaurant as they typically order steel brushes via wholesale. You might be able to buy several from them for cheap.
Step Four: Let the Wood Dry
After you have scrubbed your boards clean, leave them outside to dry, preferably in an area that gets lots of sun. If you live a naturally damp climate, you may be better off drying them inside. Depending on how damp the wood was to begin with, the drying process can take 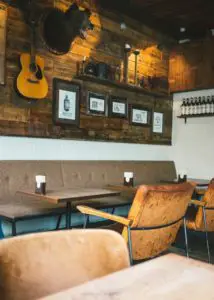 anywhere from 1-4 weeks.
You want to make sure that your boards are as dry as possible so that they do not warp or bow once you install them. A moisture meter can be a helpful tool to tell if your wood is dry enough to use. There a two types of meters- pin, and pinless.
The pin-type will run you about $25, and will have two pins jutting out from the bottom. Simply insert the pins into the boards to get a moisture reading. You will want to make sure to insert the pins running with grain for the most accurate reading. A pinless meter will cost about twice as much, roughly $40, but may be easier to use. If you have never used a moisture meter before, here’s an article I wrote on the best budget moisture meter I’ve found.
The moisture percentage shown on the meter, is completely relative. Meaning, it does not need to read zero. The reading will vary based on where you have the wood drying, and the humidity of where you live. If you live in a hot and dry place like Arizona, then you will likely get a lower moisture reading than if you lived in a state like Maine. What you are looking for is consistency in your readings. Once the moisture percentage has been consistent for 1-2 weeks, you can consider the wood dry enough to use.
Step Five: Prep the Wood for Mounting
Once your boards are clean and dry use a palm sander to remove any splitters. Sanding also helps to bring out the richness of color in the grain and knots. From here you will want to prime your boards if they are going to be painted. You may also want to consider applying a water-based poly sealer if the accent wall you are building is in a moisture dense area such as a bathroom or kitchen, or is on an exterior wall.
Quick Tip– If you are planning on staining or painting your boards, you may want to consider doing so before you install them. This may help save you time later on, and it will likely be an easier process than doing so inside your home which can often involve lots of prep work such as taping and covering your floor.
Step Six: Attaching the Wood to Your Wall
The great thing about building a reclaimed wood accent wall is that you do not need to first sand down the wall you are installing the boards on. However, you will want to make sure that you fasten your boards to more than just the studs in your wall.
It is best to first fasten layers of horizontal strip boards across your wall to give your reclaimed wood more stability. Go with strip boards that are thin in width, but long in length. 1” x 3’ or even 1” x 4’ boards should work well. Secure your strip boards by placing a screw or nail into the studs in your wall, usually about every 24 inches. Then attach your reclaimed wood to the strip boards.
Once you have the strip boards secure, I highly recommend painting the wall (including the strips) a dark color such as dark gray or black. Since reclaimed wood is “rough,” it’s not going to line up together perfectly. There will be gaps because the edges of your boards. Painting the wall a dark color will prevent these gaps from being so visible.
After the paint has dried, you are ready to start securing your reclaimed wood to the strips that you installed. Keep in mind, if you are installing these boards on a wall with an electrical outlet, switch or toilet, you’ll likely have to make some adjustments.
Electrical outlets and switches will need to be extended out so they aren’t recessed behind the new wood you’ve installed. This is a relatively easy process. You’ll need to pick up some electrical outlet extenders to accomplish this. You can find these for just a few bucks a piece. Here’s a link to them on Amazon. Scroll to the bottom of this article to see a video explaining how to extend your outlets.
Once these steps are complete, you are finished!