A jointer is quite possibly one of the most underrated tools in a woodworker’s shop. It’s will never be the first tool a person buys for their shop (nor should it be). However, once you begin looking to buy lumber from a sawmill, it is probably time to look at getting a jointer. Depending on how much lumber you buy, you may find that it pays for itself in just a couple of years.
For a complete guide that will fully prepare you on what to expect when buying wood from a saw mill and how it can save you money, check out my article here.
Purpose
If you’ve purchased wood at a home improvement store before, odds are you’ve not had to square up any of the lumber. In other words, all 4 sides of the wood have straight, parallel sides. (Please understand this excludes the bending and warping of lumber that can occur when it gets wet or is not stored properly.)
When a piece of wood has been run through a planer and cut so that all 4 sides are straight and parallel, it is commonly called a S4S board. All boards sole at large box stores come this way.
When you begin buying lumber form sawmills, it less common to buy S4S wood. If the mill does have it available, there is typically an up charge for the added service.
Its more common for the mill to sell S2S or S3S boards. An S2S board is one that has been run through a planer that has created a level top and bottom surface. These boards still have rough edges with no straight edge.
An S3S board has gone thru the same planer as an S2S, but these boards have a single straight edge.
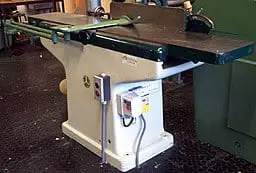
How does a Jointer work?
As jointer is built so that there is a table on the right and left side of the rotating blades. The tables are referred to as infeed and outfeed tables depending on which side of the blade they are located. These table surfaces are very smooth and often times need a thin coat of wax applied to them so that the stock moves freely and easily over them.
 Once the worker turns on the machine, the blades begin spinning. The user should slowly push their stock over the rotating blade. As the wood moves over the board, it will trim the edge of the stock. Depending on how uneven the edge of the wood is, the user may have to run their stock over it several times.
There are various adjustments that can be made so the jointer cuts more or less stock on each pass thru the machine. Most jointers have a knob that rotates which raises or lowers the outfeed table. Raising the outfeed table causes more stock to be removed on each pass. Lowering the table, causes less to be trimmed.
Do I need a Jointer?
Many of the big box stores have a limited assortment of hardwood options available in their stores. Lowes and Home Depot typically only carry Pine, Oak and Poplar. There are a few large hardwood supply stores scattered around the country that have more availability. Consider yourself lucky if you live near one.
Buying lumber directly from a sawmill is typically much cheaper than a big box store. Once someone starts selling furniture or other items they’ve created, one of the first cost cutting steps is to find a local mill to lower their material costs.
If you are feel that you will begin purchase directly from a sawmill soon, my advice would be to begin looking at acquiring a jointer. You can get a benchtop version new for about $250. However, I would recommend getting a larger floor standing unit as it can handle larger boards. Starting price for these units will be closer to $1,000 new; however, you can get an older used model for less than $500 on Craigslist if you are patient. I went this route and got an older Rigid model that has a transferable lifetime warranty on the motor for about $300. It’s been an excellent machine.
What size Jointer do I need?
The common answer that you will get when you ask this question is “Buy as big and as much as your shop and wallet can handle.” Great advice, but not always the most practical.
If you are looking at doing small pieces of work, then a benchtop model will work just fine. You can get very good results using them. However, if you plan to ever start needing to cut stock that is about 5 feet long or more, I’d recommend going with a floor unit. It is possible to build temporary infeed and outfeed extension tables, but they decrease in quality of cuts as the length of the board increases.
Once you get to the floor models, there are two size measurements that you need to pay attention to: Blade width and feed table (also called bed table) length.
Blade width – In addition to cutting a straight edge onto your lumber, a jointer can also level the face (top or bottom) of a board. Perhaps the lumber you picked up at a saw mill has a curve or bow in it from the drying process. If you have a 6” wide blade, it can level the surface of you board as long as it is less than 6” wide. The most popular sizes for hobby level jointer tend to be 6”, 8” and some 10”. It’s possible to move up a more advanced model that can go 16” or more.
Feed Table Size – In my opinion, this is the most important measurement to pay attention to. On
each side of the blade of a jointer, there is a “table.” The area to the right of the blades is referred to as the “infeed” table. The area to the left is the “outfeed” table. The greater the tables, the easier it is to cut longer boards.
The negative to buying a jointer with longer tables is the space that it takes up in your shop.
Bumping into the edges of these tables doesn’t feel great on the thigh – I speak from lots of experience. If you are worried about the space a large table takes up, there is another option for you. It’s possible to build temporary extension tables as an add on to your existing jointer. There are plenty of planes available online. I would highly recommend researching the various types before going this route. If you don’t build them perfectly square, it will cause constant headaches when you go to try to get a straight edge on a board.
What is the difference between Jointer and Planer?
When you first read about the purposes of a jointer and planer, it is easy to assume they are similar enough that you can get by with just purchasing a jointer. This isn’t an accurate assumption.
A jointer is used to cut a straight even edge on all 4 sides of a board. After a woodworker runs their board over the cutting blades of a jointer, he should have 4 square sides.
A planer is used to cut a boards thickness to a desired level. For example, let’s say you purchased 5 pieces of oak from a saw mill. You’ve run your boards over your jointer and have all even and square sides. As you lay your boards out on your workbench, you realize each board is a different height. No board has the same thickness. In this case, a thickness planer would be the perfect tool.
You can set the thickness planer to your desired thickness, and run each board thru the machine until it trims it down to your desired thickness. After running the 5 boards through it from our example, you would have 5 square boards (due to the jointer) and all the boards would be exactly the same thickness (due to your planer).
Can a Jointer be used as a Planer?
Technically, yes. In our example of the 5 boards, you could run the thicker boards over the jointer until it has cut enough of the board away so that it is the same thickness as the thinner boards. However, this method will be almost impossible ensure all the boards are cut the same exact thickness.
Safety
As with any power tool in your shop, using a jointer does present some dangers. It’s estimated that approximately 12,000 emergency room visits each year are related to injuries caused by a  jointer or planer. Must like a table saw, a jointer can cause “kickbacks” as well. A kickback occurs stock does not feed through the blade correctly. Stock then gets pinched against the blade and due to the high RPM’s of the blade, the machine kicks the stock back towards the machine operator.
There are precautions that can be taken to reduce the risk of injury while using this machine.
- Always cut stock with the grain to help reduce the risk of kickbacks
- Always apply downward pressure as you feed the stock thru the blade
- Know that there is an increased risk of kickback when cutting boards less than 12 inches in length.
- All jointers come with a blade guard. It is attached to the table so that as the user moves their board over the blade, the guard pushes away from the spring. As the guard moves away from the blades, the stock takes it’s place in covering the rotating blades. Both work in tandem to almost always keep the blades covered. Never remove these guards, under any circumstance
- Another helpful tool is the push block. These are typically plastic or wooden blocks that have grips between them and the stock. The operator sets the blocks on the stops and uses them to push the stock over the blade and onto the out feed table. The blocks help move the operators hands a few more inches away from the blades.
- Lastly, it’s highly recommended that you use breathing, ear and eye protection. Jointers will create a significant amount of sawdust and noise during use.