When you first began woodworking, your most likely source for wood was your local big box store. It’s easily accessible and everything is organized and laid out in front of you to look over. The other advantage is that everything is already cut to size and dry. Therefore, you can start using it as soon as you get it home.
Two of the big negatives to buying from a big box store is limited selection and cost. Typically, (at least in my case) the big box stores have very few options to choose from when it comes to species of woods. In my area, the only lumber options available are pine, cedar, oak and poplar.
If you are lucky, you may live in a city that has big box stores that specialized in hardwood lumbers. These stores typically offer numerous options when it comes to various species.
Though it may not appear bad, the cost of lumber in big box stores is VERY expensive. You don’t realize it because you don’t have anything to compare it to. Buying your lumber directly from a sawmill can be significantly less, though there may be additional preparation needed before it can be used as we will see below.
Buying from a mill may seem overwhelming at first. However, every encounter I’ve ever had with a mill has been positive. I typically learn something new on each visit just in general conversation with the workers. If you can overcome the first time jitters of this buying method, I think you’ll come to love the options and advantages associated with direct purchases!
Sawmill Sizes
The first step to buying lumber from a sawmill is finding a mill that will sell to the general public. Your geographic location will play a role in the level difficulty of finding a local mill. The mills that you come across will generally fall into one of three categories: large commercial operations, small regional mills and small family run mills.
The large commercial mills generally will not sell to individuals. These are large scale operations that focus on selling tractor trailer loads of lumber over something a single buyer may need.
In my opinion, the small regional mills are the best level to buy from. There is a chance you may run into the same issue as the large operations who won’t sell to an individual. However, don’t let this discourage you as these mills likely have a kiln which will be a huge time saver for you.
When you call, be prepared for them to ask how much lumber you are wanting to buy. They may have a minimum order quality (MOQ). If their MOQ is higher than the amount you need, consider finding another woodworker in your area that is interested in splitting an order with you in order to meet their buying requirement.
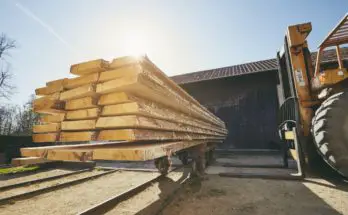
The small family or portable mills are the smallest and most likely mills willing to sell to an individual. If you visit one of them, it’s likely you will be asked to come to their house or farm to view their lumber. Most of these operations have a small portable sawmill that cuts the logs into slabs.
These mills will offer less add-on services, such as a kiln or plane and surfacing, than the larger operations. These operations will most likely be the cheapest of your options.
How to find a mill?
The most common way to find a mid-size mill is doing a regular Google search. I will typically search the name of the local city and the word sawmill or hardwood lumber. Don’t be surprised if the sawmill’s webpage is dated or even non-existent once you click on the web address. It is extremely rare that I find a website for a mill that has relevant and current information.
Many times, it’s loaded with broken links and if I’m lucky a phone number. Don’t let a poor webpage deter you from calling them though. Many of the small operations just don’t have the resources to build fancy web pages.
 To find a portable mill, I have the most luck searching on Craigslist and sometimes Facebook. Typically, doing a search for “sawmill” or “rough cut lumber” will turn up a few leads.
One thing I have found is that these mills don’t have a consistent schedule for posting ads. I would suggest getting in the habit of searching for a mill every few weeks even if you aren’t in need of purchasing lumber at that very moment. In some cities, Craigslist ads expire after 7 days. Most mills don’t repost every 7 days, so there are times you may search and find no leads for a couple months.
It’s best to go ahead and save some contacts when you find them. Otherwise, Murphy’s law will hit and there will be no listings when you need a supply.
Topics to Understand
Buying lumber from a saw mill will be different than what you are accustomed to when going to your local hardware store. I’ll go through the differences below so you know exactly what to expect.
1) Board Feet
Before calling a mill, it’s best to get a general idea for how much wood you are looking to purchase. Sawmills measure lumber quantity in “board feet.” Another way of looking at it, it the volume amount of wood that you are purchasing. It may sound complicated, but it’s not bad. So when you call, be sure to tell them the amount of wood that you want and make sure you say “board feet” so there’s no confusion.
Board feet (BF) is calculated using the following formula assuming all numbers are in inches: (LENGTH x WIDTH x THICKNESS) / 144
Therefore, the board feet of a 2×4 that’s 8 feet long would be the following: 2 x 4 x 96 / 144 = 5.33 board feet
Therefore, if you call a mill and they tell you that their walnut pricing is $2 a BF, the 2x4x8 in our example would cost approximately $10.66. Lumber prices will vary by species of wood.
Some mills will also vary their prices based on the difficulty to obtain the size you are wanting. For instance, if you are seeking a very wide board, or very thick, expect to pay a slightly higher amount because its a less common size.
TIP! I’d advise ordering about 10% more than what you think you will need. Buying from a mill will result in more waste, but it’s still cheaper than the store!!
2) Measurements
One minor difference that you need to be aware of before visiting a milling is centered around how they measure board thickness. Thickness is stated as a fraction of fourths.
For instance, let’s assume you are looking for lumber that is 2 inches thick. A mill will state the thickness as 8/4 (pronounced EIGHT FOURTHS). When you dived 8 by 4 you get an answer of 2, which is the two inches that we started with.
One last example would be if you wanted a 1.5″ board. This board would be called a 6/4 (SIX FOURTHS).
3) Moisture Content
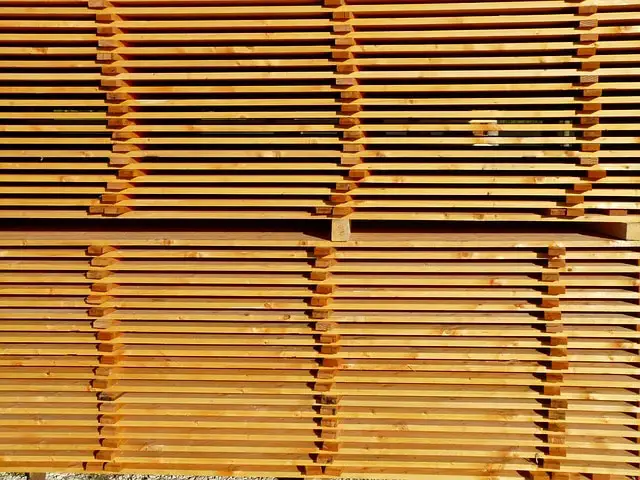
When you arrive at the mill, you will likely notice right away that their wood is stack with stripes of wood in between each board. This is often referred to a “stickered” wood. The reason the mills do this is to help the boards dry quicker and evenly.
When a tree is initially cut down, it has a very high amount of water contained within the trunk. It’s not uncommon for a pine log to have a moisture content (MC) of 100% when it’s originally cut down. A 100% MC indicates that half of the weight of the log comes from water and the other half is the wood itself.
Once the mill begins cutting the log into boards, more of the wood is exposed to the surrounding air allowing it to dry quicker. This is why the mills sticker their lumber to allow air to move freely between the boards.
Moisture Impact On Wood
It’s important to ensure that the moisture content of your lumber is at the proper levels before using it in a project. The goal is to get the wood to the point where the wood no longer expands or shrinks based on the surrounding moisture in the air. This is referred to it’s equilibrium moisture content (EMC).
The moisture content of wood is impacted by the relative humidity of the environment that it is in. Therefore, if you live in an area that is humid, the wood will take on some of the water in the air which in turn causes it to expand. Likewise, if the humidity levels decline, the wood will lose some of the moisture it contains, thus causing the wood to shrink.
This can cause serious problems using wood before it has dried to the correct levels. For instance, a few years ago, I built a walnut table top. The wood had dried for a while, but still wasn’t where it needed to be.
Being impatient, I ignored it and told myself it was “close enough.” The problem didn’t appear quickly. However, after about 6 months, I began to notice that the boards had started to come apart in sections. I’ve put the task off, but the repairs that are needed will take quite a bit of time. Something that could have been avoided had I remained patient.
I highly recommend that you take a moisture meter with you when you visit a sawmill. Moisture meters are very easy to operate. In fact, most just require that you press a single button for a reading. Personally, I really like the General Tools MMD7MP model that you can find here. It’s a great beginner model. If you would like a deep understanding of moisture meters and how they work, you can check out my article here.
What Moisture Content is Acceptable?
The acceptable moisture content levels vary based on your project. Generally, for a woodworker, you will want to get your MC down to around 6 – 8% before using it. This will vary slightly depending on your location. For a (free) detailed scientific explanation of how moisture content occurs, take a look at: Wood Handbook, Wood as an Engineering Material. If you aren’t interested in the entire 500 page article, at least take a look at table 4-2 on page 83. This table gives you a general idea of what the moisture content should be for your area based on current temperature and humidity.
How Can I Dry My Lumber?
Kiln
The easiest method to have your wood dried is to buy it after it has been sent through a kiln. This is why I mentioned above that it’s best to purchase from a regional saw mill. The mid sized mills are more likely to have access to a kiln. Due to space and costs, most of the small portable mills only have the ability to use the air drying method. It is likely that the mill will charge you a higher rate per BF for kiln dried wood, but it is well worth the extra fee.
A kiln works similar to an oven. The lumber is loaded into a large chamber and sealed shut. Depending on the kiln, different methods are then used to send heat through the chamber. Kiln drying makes it much easier to control the moisture content levels during the drying process. Another benefit is that the kiln method is excellent at killing any bugs that may be living within the wood.
The amount of time lumber must remain in a kiln can vary significantly based on the species of wood. According to this Wikipedia article, “Modern high-temperature, high-air-velocity conventional kilns can typically dry 1-inch-thick (25 mm) green lumber in 10 hours down to a moisture content of 18%. However, 1-inch-thick green Red Oak requires about 28 days to dry down to a moisture content of 8%.”
There are plans online for building your own kiln at home. Many of these plans involve using solar energy as their primary method for heating their makeshift chambers. I’ve never tried doing the method myself, but it’s something I’d be willing to attempt if I didn’t live in a neighborhood.
Air Dry
If the saw mill you purchase from does not have a kiln and making your own kiln isn’t an option, there is one additional option. You can create a setup similar to the mill and sticker your own boards so they can dry on their own. The negative side to this option is that it is a slow process. The general rule of thumb for air drying is that it takes 1 year to air dry 1 per inch of lumber thickness. So in other words, if you have a board that is 2″ thick, it could take up to 2 years for it to dry completely.
How to Measure Moisture Content
Fortunately, there are moisture meters on the market that make it easy to measure the MC of your wood. You can pick up a basic model for as little as $20. Just ensure the meter you get its for wood as there are similar meters made that only measure soil. These meters take their reading by sending small electrical currents through the wood. The quicker the current flows to the next sensor, the more water that is contained within the wood.
There are two different types of meters available – pin and pinless versions. Pin versions have 2 needles that stick out of the unit. You take a measurement of the wood by pushing these pins slightly into your wood. The pinless version, just as the description states, comes without pins. For these units, you simply lay them on top of the wood and they are able to take their measurements. As with anything, there is debate between the two sides as to which is better. Personally, I prefer the pinless version because I feel it’s easier to take a measurement.
4) Wood Cuts
The next area that you should be familiar with when buying from a mill is the different cuts that are made to a log. You won’t need to be familiar with this topic when you are looking for your mill, but it is good to have a firm understanding prior to actually visiting the mill, especially if you are allowed to pick and choose your lumber.
Some mills will allow you to look through their stacks of wood and you are able to pick and choose which boards you want to purchase. Other mills will require that call in your order and when you arrive, you are given a stack of pre-selected boards. Either method will work. However, if you are looking for a certain grain finish or pattern then its best to go the route of picking your own pieces.
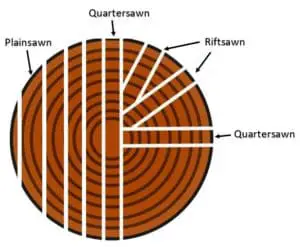
When a mill receives a log in they have three general methods to cut it. These cuts are referred to as: Riftsawn, Quartersawn and Plainsawn. If you could cut the same log with each of these different methods, you would get a distinct difference in appearance and percent of usable product from each. The picture to the left shows how each are cut from a log. Below I will
go into further detail on the difference of each cut and how it impacts you.
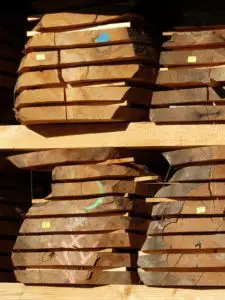
Riftsawn – This cut is defined as a cut that takes place between a 30 and 45 degree angle to the center of the log. These cuts will have very consistent grain and pattern features. This type of cut is most desirable by those making furniture. These cuts are most poplar on table legs where the maker desires a matching finish across all pieces. You can see from the photo below that all four boards have grain features that match throughout.

Quartersawn – Quartersawn cuts are made by dividing the log in to quarters to perform the cuts. The advantage to these cuts are that they are less likely to warp over time. They are also more likely to dry and shrink evenly thus making them stronger, especially in the case of red oak. Famous furniture maker Gustav Stickley, once said of the quartersawn method “(it) renders quartersawn oak structurally stronger, also finer in grain, and, as shown before, less liable to warp and check than when sawn in any other way.”

Plainsawn – This is the easiest cuts for the mill to make, therefore these cuts are also the cheapest if you are taking logs to a mill and having them cut. These cuts also produce the least amount of waste because the mill is using the entire log and not worrying about grain patterns. As you can also see in the photo below, the grain patterns are much more irregular.
5) Milling Process
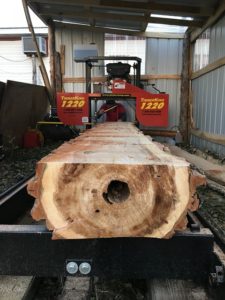
The last part that we need to cover is the milling process for your lumber. Milling is the process of converting a cut piece of a log into a straight and workable board. When a mill cuts the initial log using any of the three methods we described above, they typically use a band saw. Since they are cutting an imperfect rounded log the cuts with the band saw are not going to be perfectly straight and parallel.
Some mills won’t provide any additional services after the log is cut. Others may provide services that include planing and/or adding a straight edge. It’s important to know what you are getting to ensure you have the proper tools at home. The mid-sized mills are more likely to offer surfacing services than the small portable mills. If you elect to have them surface the boards for you, expect to pay 50 cents or so more per board foot. I highly recommend paying the extra fee. It will save you some time later. Even if you pay an additional dollar or more per BF to have the mill kiln dry and surface your boards, it will still be cheaper than what you can get in the stores unless you are buying a species that is hard to find.
Surfacing Options
Wood surfacing from a mill is referred to a S2S, S3S or S4S. This stands for “Surfaced # Sides.” For example a S3S stands for “Surfaced 3 Sides.” I’ll go into more detail below on the meaning of this terminology.
None – This is the most common option available. It’s the cheapest, but it will require the most work once you get it home. When you buy a piece of wood that hasn’t been surfaced at all, you are getting a board that’s only been cut from a log. It may even have a “live edge” meaning you can see exactly where the bark was peeled off of the tree.
In order to properly prepare wood that the mill hasn’t surfaced, you will need a jointer, planer and table saw. The first thing that you have to do is get a straight edge for your board. This is accomplished by using a jointer. If you are interested in more detail on what a jointer does, check out this article that I wrote. You will have to run the edge of your board over your jointer numerous times. Each time it will cut away a small layer of wood. After enough passes, you should have a straight edge to begin working from.
After you have a straight edge, you now have the ability to run it through your table saw. Simply place the flat edge against your table saw fence and rip the board to your desired width. The last step is to run your board through your thickness planer. The goal here is to trim away small amounts from the faces of your boards until you reach your desired thickness.
TIP! If you need to buy a planer and jointer but only have the budget for one, you have options! I recommend buying a thickness planer. For your jointer – look at hand tools. Hand planers have been used for hundreds of years. You can pick up used ones on eBay.
S2S – This type of board indicates that the wood has 2 sides surfaced. These boards will have been planed therefore the thicknesses should be consistent throughout the board and both faces should be smooth. These boards will NOT have a straight edge. Therefore, before using them, you will need to run them over a jointer or use a hand plane in order to get a straight line to cut to width.
S3S – Boards in this category have been planed like the S2S boards, but they do have ONE straight edge. This will allow you to avoid having to use a jointer. You’ll just need a table saw in order to cut your boards to your desired width. If possible, I would recommend having your boards finished S3S at the very minimum. This will save you time once you get them home.
S4S – If you’ve only used hardware stores to source your lumber, then you are already accustomed to boards that have been prepared using this method. These boards will be straight on all four sides with parallel straight sides. There should be no prep needed before starting your project. This will be the most expensive option, but I recommend it if you can find it.
Below is a recap of some of the questions you should ask when calling around to mills. I’ve also included a few things to take to the mill when you visit.
Questions to Ask
- Do you sell to the public?
- Do you have a minimum order quantity? If so, what is it?
- Do you have kiln dried lumber available?
- Can I look through the wood or do I need to order ahead?
- What grade lumber is available and their prices?
- Depending on whether you have a jointer and planer – Do you offer S4S lumber?
Things To Take The Mill
- Pencil
- Tape Measure
- Moisture Reader – Again I recommend the MMD7NP, which is here.
- Phone with Board Foot Cost Calculator app
- Gloves
- Rope and straps to tie down the wood