Insulation
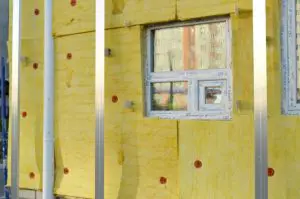 At one time or another you have probably heard someone reference insulation by it’s R value. The R value is short for the products effectiveness to resist conductive heat flow. The higher the R value of a piece of insulation, the better it does at creating an air barrier between to elements. Common insulation levels that you might find a your local big box stores can range anywhere from an R8 to R38.
Upgrade #1 – Garage Door Insulation
Upgrade #2 – Door Hinges
Upgrade #3 – Upgraded Threshold
The last upgrade that I made was to add a door threshold for my door. The house we bought didn’t come with one, so I installed it to close the gap between the floor and the door. I think adding it has certainly helped, but the addition wasn’t quite as noticeable as the other two changes. However, for $30 I think it was well worth it.
Windows
Windows are important for your shop. Having some natural light in your shop can make it a much more enjoyable place to be. The negative to having windows is that its an additional opportunity to allow air to escape or enter your shop. In addition, the sun can play a significant role in heating up your garage in the summer if it’s facing to the east like mine.
Obviously, you have the option of replacing your windows with more up to date models. Technology is constantly evolving and making windows more and more efficient. If replacing your windows doesn’t sound appealing, one option to try is tinting your windows.
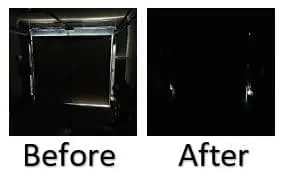
My shop has two regular size windows facing the east. I installed blinds as the first barrier to block the sun’s heat in the summer. This helped some, but it didn’t help as much as I had hoped. In a quest for something better, I came across window tinting options. I found some DIY options available that actually ended up working really well. I watched a few Youtube videos prior to installing. I do recommend some help when doing it as I think it would be near impossible to do it alone. Installation will take some patience. However, I’m glad I did it. There was a noticeable different in the temperature of the shop during sunrise.
Walls
Heat
It’s typically much cheaper to heat a space than it is to cool it. Here’s a few of our suggestions on possible solutions to consider for your particular setup.
Kerosene Heater
These heaters are not as popular as they once were. I’ve had one in my shop for years and love it. It’s easy to use, and it warms my two car shop up in no time. I usually turn it on for 30-45 minutes and then I can turn it off for a while before it starts getting chilling. As with anything that has an open flame, it’s very important to NEVER leave one of these heaters unattended.
Wood Stove
Wood stoves were once a staple in almost every shop but once more options became available their popularity declined. Wood stoves certainly have their advantages such as their lost costs to operate. The two major drawbacks that exists for them is 1) it feels like you are always having to gather or find wood to keep them burning 2) the risk of having an open flame in a woodshop where saw dust and chemicals are present. It’s important that stoves are never left unattended when lit to avoid a potential fire hazard.
Infrared Heater
Infrared heaters are like having a sun in your garage. They work by transferring the high temperatures created with their tubes to the lower surrounding air temperatures. The interesting thing is that these lights produce light that is invisible to the human eye. The advantage to using one of these is that it provides a more even heating effect in your shop whereas other methods will cause the heat created to instantly rise to the ceiling. You can pick up heaters that run on natural gas or electricity. On average, these units are about 17 center per hour to operate. The initial purchase of the equipment will start at around $600 and go up from there based on whether you will need to hire a contractor to install.
Heated Jacket
Perhaps your budget doesn’t allow for a large changes to your shop but you want to continue working in your shop during the winter. One reasonably priced option for you may be to invest in a heated jacket. They look just like a normal jacket that you might wear, however, there is a battery pack hidden inside. All you do is flip the power on and it begins heating the pads inside your jacket. This option isn’t just limited to your garage, but can be a nice option for you for any outdoor work that you have to take care of during the winter.
Anti-Fatigue Mats
You may not think of these mats as being good at keeping your shop warm, but they actually do. They add an additional layer of insulation between you and the cold concrete floor. Of course, they also provide addional comfort to your legs and back by reducing the strain that comes with standing on a concrete floor all day.
Cool
The options available to keep your shop cool are more limited that the options available for heating. These options are also more costly to operate. That’s why it’s important to ensure you’ve taken all possible steps to ensure your insulation is suitable for your shop.
Outward Fans
To create an air flow, one option for your shop is to set up some fans in a door or window and blow air OUT of your shop. To go even a step further, you could put another fan in a window that blows in to your shop. This setup will allow a circulation of the air and create a small breeze in your shop if they are setup correctly. It won’t get cool in your shop, but it will create a small breeze that will be a nice relief from the summer heat. The nice thing about fans is that they are incredibly cheap to operate. On average it costs less than 2 cents per hour to have a fan running.
Swamp Coolers
These are also referred to as “Evaporator Coolers.” You can pick up one these units starting around $350 and they go up from there based on the size and features that you need for your setup. A swamp cooler works by drawing in warm humid air. It then forces that air over coils that are are cold, similar to what you find inside a refrigerator.
As the air passes over these coils, it draws the water from the air which produces condensation. Swamp coolers come with a water pan in the bottom where this water collects. You can also connect drain hoses to carry the water outdoors if you prefer. Once the warm air has passed over the cooler coils, it’s then blown back into your show, which creates a cooling effect in your shop over time.
It will ultimately depend on the size of the unit you have and the cost of electricity in your area. On average, a swamp cooler will cost about 40-50 cents to run for 10 hours during the day.
Split Unit AC’s
Split unit options are a common solution to creating a cooler work environment for a shop. These are similar to a central heat and air unit, except the components of the machine are in two major parts. One piece of the machine is installed outside and close to the room or area that it being cooled. The outside unit contains the compressor and condenser which also help reduce the inside noise.
The other half of the unit is hung on a wall indoors. This section of the machine contains the evaporator which blows out the cooler air.
The major draw back on these units is the initial costs to install the units. On average, a unit runs about $2,000 per ton. Large AC units are measured in “tons,” but this is only their cooling capacity and not their actual weight. A ton is equal to 12,000 BTU’s to offer some comparison to some of the other cooling methods we’ve looked at.
Although the upfront cost to install a split unit AC is much higher than what you can get a window unit for, over the long run the split unit ends up being much cheaper. Many factors will impact the cost to operate these units, but on average, it costs about 20-25 center per hour to run these units.
Portable AC Units
I have a portable AC unit in my shop for the summer time. It’s probably not the best option available to me, but it works decently. These units require an exhaust hose going to the outside. I have my setting in the bottom of a window of my garage. Both of my windows face the road, but I planted a couple of bushes in front of the window to help hide the the hose that sits in the bottom of the window sill. It’s done a great job and you have to look closely from the road to see it.
If you look around, you can find a combo unit, like I have. My particular model has three options: Heat, Cool and Dehumidifier. I don’t use the heat option quite as often since I have the kerosene heater, but I use the other two options pretty often during the summer.
The electricity cost of a 7,500 BTU portable AC unit will cost about $3.55 to run for 10 hours per day.
Window Air Conditioner
These are probably the most common AC’s that are used in a small shop. Window units can provide quick relief to the sweltering heat in a workshop. The one drawback to these units is that they have to site in a window. This could be an issue if you windows are facing a road as it will be tough to hide them. Some neighborhood HOA’s actually have rules against getting them installed. These units are relatively inexpensive to buy, however the operating costs are higher than some of the other options we’ve looked at. You can pick up a small 5,000 BTU unit for around $150.
If you decide to go this route, it is important to buy the correct size unit for your space. The common thought is that you need 20 BTU’s for each square foot of space you want to cool. A 2 car garage is need to be a minimum of 20 feet by 20 feet, which equates to 400 sq ft. A space this size, would need a unit that is around 8,000 – 12,000 BTU’s . If you have high ceilings or windows that will take direct sunlight, it is recommended that you scale up your needs by 10-15%.
Below is a table to give you a starting point for choosing the unit size you need.
| Sq Footage | Recommended Size |
| 150 – 400 | 5,000 – 8,000 BTU |
| 400 – 600 | 8,000 – 12,000 BTU |
| 600 – 900 | 12,000 – 18,000 BTU |
| 900 – 1300 | 18,000 – 25,000 BTU |
The electricity cost of a 10,000 BTU portable AC unit will cost about $4.68 to run for 10 hours per day. That price increases to $6.63 for a 14,000 BTU unit.
Fans
There are numerous fan options available for you to put in your shop. You can do anything from small desktop fan to large commercial fans that are 48″ or more in diameter. Your limits really come down to your budget and the floor space that is available for the fan to sit on. If you have the wall space, there are models that allow you to attach them to your walls. One fan option to consider is the Big Ass Fan brand. They can custom make some amazing fans that are massive and move a consider amount of air in your shop that make it instantly cooler!
Humidity
Exhaust Fans
Improving the overall ventilation in your workshop is the best solution for reducing the moisture in your shop. Getting the circulating will be the most effective option available. The layout of your shop will be the deciding factor in how easy it is to install exhaust fans. For instance, my shop has the absolute worst layout. Each of my garage walls are surround by brick so cutting an outside fan through the brick won’t be easy. In addition, our HOA requires that an exhaust fan are not visible. One option is to go up thru the ceiling and into the attic space, however, in my case, there’s a room above my shop. Hopefully your setup is a bit easier if this is a solution you wish to pursue.
Coat your floor
An option that has a few benefits is adding a coating to your garage floor. There are several DIY options avaiable, but these coatings help reduce your humidity. In addition, the provide excellent protection to your garage floor and they give you floor extra traction in wet conditions.
Plants