Have you ever built a piece out of wood and after a few months noticed that the wood began to crack perhaps become unstable at some of the joints? Or, perhaps you made table that you swear was perfectly square when you built it, but now one side it a quarter of an inch longer than the other.
If you answer “yes”, then odds are your project suffered from a change in moisture which caused  the wood to expand or contract. Beginner woodworkers (and some experienced) are all too often guilty of not checking the moisture levels of the wood they are using because they assume it’s “dry enough.” Many times, woodworkers assume that since their seller stated that the wood has been air drying in a barn for 5 or 10 years, that it’s ready to be put to use in a project. This assumption can lead to serious issues in your project later.
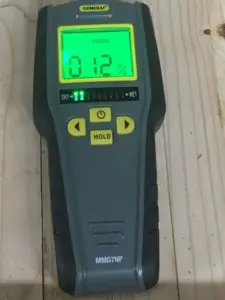
Fortunately, with modern technologies, it is very easy to determine the moisture levels of your wood. A good reliable moisture meter can be picked up for less than $50. My personal choice for an excellent moisture meter is the General Tools MMD7NP which can be found here. For a detailed review of this meter, please check out this page.
A common question that I hear is “Do Moisture meters really work on wood?” The answer is – absolutely. I have never had an issue with wood that I have properly tested. I think beginner woodworkers don’t trust moisture meters because they don’t understand how they work. Below is an overview I have put together of how moisture meters operate and why you should use them.
Definitions
There’s a couple of terms that you will often hear when you start looking into understanding the moisture levels within wood. The first is called moisture content (MC). It is used to measure how much water is present within a piece of wood.
Another common term that you will hear is a wood’s equilibrium moisture content (EMC) level. The EMC of wood is the point at which is no longer gains or loses water from it’s surrounding environment. This number can vary between species as well as geographic locations. People living in a dry, arid climate will have a lower EMC that someone in a humid, wet climate.
Water within Wood
Typically, this number is highest right after a tree is cut and then decreases over time as moisture pulled from the wood and evaporated.
Woodworkers aren’t the only ones that need to check the MC levels before using a piece of wood. These scenarios can range anywhere from the logs you’ll be using at your campsite to the hardwood flooring you are about to install in your new house.
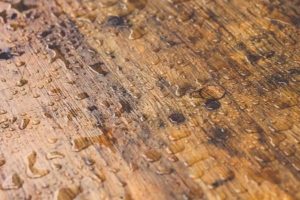
Many people are amazed when they find out how much water a log or piece of wood can hold. In fact, some trees can contain upwards of 200% moisture content just after being cut.
Wood structure
For water to get from the roots of a tree to the outer branches, trees need an efficient way to move water within themselves.
The trunk of a tree is made of up long fibers that extend vertically (up and down) within the truck. On a microscopic level, these fibers look like small tubes that carry water from the bottom of the trunk to the top.
As the moisture content of a tree increases, these “tubes” swell which allows them to hold more water. Conversely, when wood loses moisture, these tubes contract. This expansion and contraction is what causes the movement in wood that you want to avoid when woodworking.
How high MC’s can Impact You
The target moisture content of wood varies based on how it is being used. Some applications can handle much higher amounts of water than other others. Lower MC’s will be required for more precise applications of wood. This is why moisture meters should not be viewed as tools that can only be used by woodworkers.
 Hearing that you should use a moisture meter before throwing a log on a fire might come as a surprise if you have never used one before. However, if you’ve ever tried to burn a log that is wet or recently cut, you’ve probably experienced some frustration in trying to get the wood to burn. If you were able to get a flame to take, you probably witnessed an extreme amount of smoke coming from it. These would all be indicators of high moisture levels within the logs. The general consensus is that logs should have a moisture content of less than 20% before burning.
Another example of when it’s important to test your wood is when it comes to installing hardwood flooring. When flooring is installed, it is done so with the expectation that the wood will swell and constrict due to changing weather conditions. However, there is not enough space available for it to significantly constrict due to high moisture content.
Installing hardwood flooring with high moisture levels can be a costly mistake that results in visible seams opening between the boards. Often these seams won’t appear for months after the installation. Therefore, it’s very important to check multiple pieces of flooring, from several different boxes before installing in your home.
The suggested moisture level of hardwood flooring should be around 7-8% at the time of installation.
How Do Moisture Meters Work?
Though moisture meters can differ in appearance (we will cover that shortly), they all work generally the same. Each of them pass a small amount of electricity through the wood being tested and measure how quickly the charge passes from one sensor to the other. Since electricity moves quickly through water, the more water that is contained in the wood, the faster the electrical charge will arrive at the second sensor.
What is the meter telling you?
When you hold your moisture meter against a piece of wood, the screen will return a number as a percentage. This number will vary from 0% to 100%. This number is telling you what percentage of the wood’s weight is made up of water. So for instance, if your meter returns a value of 30%, it indicates that approximately 30% of the wood’s weight is made up of water.
Types of Meters
If you have researched or considered purchasing a moisture meter, it is likely that you have seen there are two common types of meters available. They are often referred to as simply pin and pinless meters. Each have their pro’s and con’s which I will cover below.
Pins
There’s no mistaking whether a moisture meter is a pin or pin less version when looking at it. The pin models come with two nail like pins that extend from the unit. To use one of these, you simply stick the pins into whatever material it is you are measuring for moisture. The meter measures the rate at which the electrical current flows from one pin to the next in order to determine how much water is held within it.
Many people like the fact these pins are very precise and accurate. The negative – and it’s a significant one depending on what you are testing, is that it will leave two pin holes in your material that you will need to patch up.
Pin less
The pinless units were created to eliminate the damage caused to your material by using a pin meter. Testing with these units will leave no damage to your product. The negative to using these meters are that the tests are an average of the area so they are quite as precise as the pin meters.. The other thing to note, is that your material will need to be relatively flat in order to use a pin less meter. Otherwise, you won’t be able to have enough of it come into contact with the meter for it to get an accurate reading.
Ultimately the decision between these two types of models comes down to personal preference and what type of material you will test the most. Personally, I’ve always used a pin less meter and have had great success with them.
TIP – When using pinless meter, it is important to know how deep the signal of your meter penetrates. This is especially true when you are testing a thin piece of wood, such as hardwood flooring. If you flooring is half an inch thick, but you meter reads at a depth of ¾ of an inch, you will need to ensure a second piece of flooring is under your test piece. Otherwise, you may get an inaccurate reading because your meter will pick up whatever material your ½ piece of wood is sitting on.
What features to look for?
As with most tools in your workshop, the features in the tool will increase or decrease based on the price you are willing to pay for the it. This is no different for moisture meters.
Entry level moisture meters are going to be very basic. For the most part, you’ll turn them on, hold them against a board and press a button when you are ready for it to return a value. Once you are finished, you power it off and you are done. Just because these units are basic in their features, does not mean they should be ignored or not considered when buying. If yourself a casual or beginner woodworker, I’d recommend buying this level of moisture meter.
There’s no reason to invest a bunch of money in one of these unless you are using it constantly. A basic model will give you every bit of information that you need to get started. If you follow my tip below in the “How do I know I’m at the correct EMC” section, then any moisture meter will work.
If you pay a bit more for a meter, you can get one that allows you to enter the type of wood you are testing. It will give you a more accurate reading than the basic models. The density of wood varies by the species of wood. Softwoods like pine are must less dense than hardwoods like oak or walnut. The denser the wood, the less room there is within the wood to hold water.
Meters that allow you to enter the species being tested will make an adjustment to the measurement based on the density of that particular species. This is what helps improvement the accuracy of the reading.
The most expensive meters, which can run a few hundred dollars, are geared to provide the most accurate reading possible. These meters will most definitely allow you to enter the wood species. In addition, they will measure the moisture of the wood much deeper than the lower prices meters. Wood dries fastest on the out edges because it is exposed to the surround air. Therefore, if you have a piece of wood that is several inches thick, it’s important to get a reading as deep as possible. That’s where the meters will be extremely helpful.
What EMC is best for woodworking?
There is no magical EMC that will work for all species of wood or all projects. There’s actually several factors that can influence best lowest EMC you can obtain with your wood. One of the major factors that can influence the best EMC you can obtain is where you live! If you live in an area with a dry climate such as the Southwest portion of the United States, it will be much easier for you to get your EMC lower than someone who lives in a humid climate. Wood often takes on the relative humidity of the air that is surrounding it.
Even though there is some variance between locations, the average house in the United States has a relative humidity of about 9% when indoors. Therefore, it is suggested that your wood have an EMC of no more than 12% before using it in a project. The more favorable range is something in the 9-10% range.
How do I know I’m at the correct EMC
Since the true EMC of your project can vary based on everything from the species of wood, age of the wood, and the surrounding temperatures and humidity it can be easy for you to still have uncertainty of what your target EMC should be in a piece of wood before using it. Here’s a trick that my dad taught me several years ago that has worked perfectly for me. This is also why I feel completely confident in recommending a basic level moisture meter.
As I mentioned before, wood dries faster on its outer edges than in its middle. That’s because the surrounding air pulls the air from the wood cells that are closest. Once your wood has reached is EMC, it the numbers on your meter will become more consistent. If you test a “wet” piece of wood for several weeks in a row right after it has been cut, you’ll see the number on your meter vary significantly. However, after a couple of years, that board will get to the point where the number will rarely, if at all, change.
 With this information in mind, this is what I do to ensure my wood has reached is best moisture content level. When I buy a board, I cut a small strip off from the end. It doesn’t have to be a whole lot, but enough for my meter to fit on it to get an accurate reading. I then store this smaller piece of wood near the larger board. Depending on how much wood I’m drying at the time, I will someone mark the two boards so that I know they two go together, but I always store them in the same room and under the same conditions.
Since we learned earlier that the wood nearest the edges of the board dry quicker, we can assume that smaller boards dry more quickly throughout than larger boards.
Therefore, when I’m looking for a piece of wood to use, I will measure the moisture content of my small boards. Next I will measure the larger board that I cut the smaller piece from. If the readings on the two boards are equal, then the board have reached their EMC. If they aren’t the same, the larger board still needs to dry more before using it.
Quick example – Let’s say I bought a board of walnut a couple years ago. When I bought it, I cut a 4” piece off the end and stored it next to the larger piece. Today, I went to test the smaller board and it returned a reading of 10.3%. I then went to the larger board and the reading came out as 12.6%. This tells me that the larger board needs to sit longer until it has decreased its moisture a bit more.
How to lower EMC
Now that you understand how a moisture meter works, the general range your EMC should be at, the next step is to learn how to lower your moisture levels. There are generally two methods for lowering the moisture levels in your wood.
Kiln
By far the easiest way to get the EMC down in your wood is to run it thru a kiln. Many times, when you purchase wood from a large sawmill, they will give you the option of paying a higher price for running your lumber thru a kiln. I think this service is well worth its price. Generally, the cost is calculated is added on as an additional 25 or 50 cents per board foot of the wood that you purchase. Buying from a sawmill for the first time can feel intimidating. Here’s an article I wrote that will prepare you for everything to expect.
When the lumber is sent thru a kiln, it is usually kept at a temperature of around 215 degrees for anywhere between 24 and 48 hours. This prolonged exposure to the high temperature pulls the moisture out of the wood for a consistent removal of the water being held within. The other thing that I like about the kiln method is that it kills any bugs that may have burrowed deep into your wood. Neither bugs nor their eggs will be able to survive these high temps for the extended period of time.
If you’ve purchased your wood from someone who doesn’t have the ability to use a kiln, it might be a good idea to ask your saw mill if they know of anyone in the area with a kiln. If you are lucky, there may be someone that is willing to dry your wood for a small fee. Unless the cost is extremely high, I think it’s well worth it.
 The last kiln option available to you if no one in your area has one to use, is to build one yourself. It’s much easier and cheaper than you might imagine. Many people have had success building a solar kiln. These work much like a greenhouse with the option of adding an additional heat source if needed. This method will probably take a bit longer for your wood to dry but depending on how successful you are at getting your temperatures above 215, you should be able to get your EMC to the 9-12% range in a matter of a few weeks to a few months.
Air Drying
The last option available to woodworkers trying to lower the EMC is to simply let it air dry. This is certainly the most inexpensive option, though it will take the longest. Air drying lumber is as simple as stacking the lumber so that there is spaces between each board that will allow air to freely pass between them. Over time, the moisture will be drawn out of the wood.
Unfortunately, it can take months, if not years for the moisture content to drop to the level you need it at. The general rule is that your wood needs 1 year to dry for every 1 inch of thickness. Therefore, a board that is 2 inches thick, will need to sit for 2 years until it can be used.
Wood Repairs
Using a moisture meter isn’t limited to testing it on new lumber that has just recently been harvested. One such example of this is when you are making repairs. For instance, if you are repairing the drawer on an antique cabinet, it is important that you test the EMC of both the original piece and the new wood that you plan to use.
It’s suggested that the EMC of the new wood that you are using to make the repair is as close as possible to that of the original piece of wood. This will ensure the expansion and contraction of both sets of wood is similar.
Conclusion
Hopefully this article has answered any questions you may have had previously about moisture meters and how they work. Again, I feel that they are a very important tool for any woodworker to have in their shop. I think once you have one, you’ll be surprised at how much you’ll use it around the house as well as in the shop.