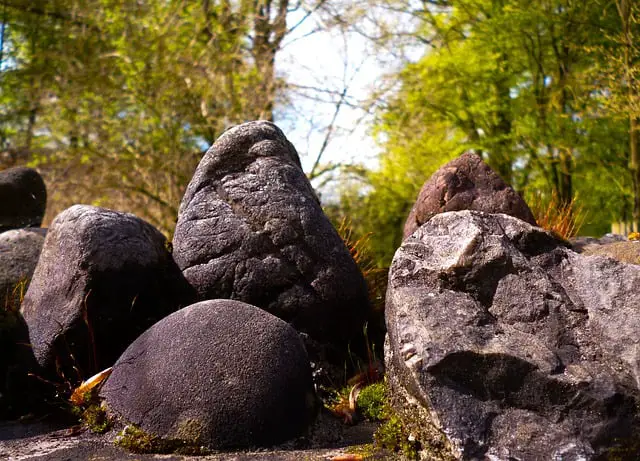
Even though my website is dedicated to woodworking, I encountered a problem in my yard that I wanted to share. I live in a very rocky area. In fact, when people go to put install in ground pools in my area, it’s common for thousands of dollars of cost be added during the project because the installer has to rent expensive equipment to chisel away very large boulders in the ground.
We’ve live in our house about 5 years. There is one large boulder above ground in our backyard. It’s never bothered me too bad. However, there are two semi buried rocks in the yard that are near trees.
Since they stick out of the ground, I can’t pass my riding mower over them and get 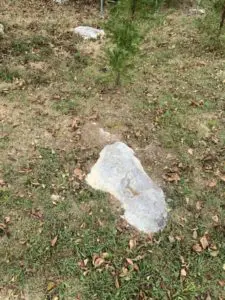 between the trees without the blade hitting them. I had tried covering them with dirt but rain would always wash the dirt away.
For about a year I’ve been going back and forth on how to tackle the rocks and remove them. Renting large equipment or hiring someone to take them out was more trouble than just keeping them.
Below I’m going to cover two methods I came across to remove boulders or rocks from you yard without using major heavy equipment.
Both options work well. It really just depends on how big of a rock you are wanting to remove as to which method you use.
How to remove a large rock from your yard
Option 1
This is the method that I started out using. It actually worked well. I practiced by removing several smaller (but still too heavy for one person to lift) rocks from other spots in my yard (remember, I said we have lots of rocks here).
Tools needed:
- Rock Wedge/Shim (Amazon link)– This tool is the key to being able to break the rocks apart. They don’t look like much, but they work great. In order to use them, you’ll need to drill some holes in your rock. Below, I’ll provide more details on how they work. These wedges come in several different sizes. I went with the 5/8″ size.
- Masonry drill bit (Amazon link) – I highly recommend getting a name brand masonry bit so it doesn’t dull too quickly for you. I’ve always had good luck with Bosch. The link I provided will give you several size options. If you go with a 5/8″ sized wedge, then you should get the same size bit. Just make sure it’s a masonry bit.
- Hammer Drill or SDS Drill – an electric hammer drill will do the job. However, it is much slower than using an SDS drill. When I drilled the holes for my wedges, I used an electric hammer drill. Each hole probably took me about 8-10 minutes to drill and I only went about 6″ deep. I’ll provide more details on using an SDS drill below!
- 3lbs Sledge Hammer (Amazon link) – You do not want to use a large sledge hammer on the wedges. They are strong and made of steel, but a large sledgehammer will bend them. They goal isn’t to pound the wedges. It really doesn’t take much force.
- Pry Bar (Amazon link) – I’d also recommend getting or borrowing a crow bar. It’ll help separate the rock as they break apart.
- Gloves – Any types of leather gloves will work. I was surprised at how sharp pieces of rocks can be when cracked!
- Safety glasses – I highly suggest some because I learned rocks can shatter and send chunks at you.
The Process
Surprisingly, the wedges work by using the pressure to pry the rock or boulder apart thus causing it to split. Here’s how you do it:
Drilling
I started by drilling holes approximately 6 inches apart and in a straight line. You should try to make all the holes the same approximate depth. I went about 5-6″. You want to make sure the wedges can fit down into the holes and still have plenty of room for you to drive them further down.
Cutting the holes will be the most time consuming part. I used an electric hammer drill and it probably took 10-12 minutes or so for each hole.
Wedges
Once your holes are made, you will take the wedges and push down into each hole. Make sure all the wedges are lines up in the same direction. You want to line the wedges up so when they force the rock apart, it creates a crack that leads from one hole to the next. Once you all the wedges are set, you’ll take your sledge hammer and firmly hit each wedge.
Rather than banging on one wedge continuously, you should give each wedge a couple solid taps and move on to the next one in line. Repeating this cycle and moving up and down the line of wedges help increase the force and pressure on the rock.
After a few rounds of hitting the wedges, you’ll likely hear a small crack form. This is one of the most gratifying sounds you’ll ever hear!
At this point, you should keep double tapping the wedges. You should see the crack continue to grow until the wedges finally will no longer work because the hole has opened up too much.
If the cracks formed the way you had hoped and the rock is in smaller pieces, you can now use your pry bar to wedge the rocks apart.
If some pieces of the rock are still too large to move, you can always drill additional holes and start the process again.
Option 2
This option is similar to #1 but instead of using wedges to break the rock, you will mix up a powder that looks like concrete. Then you’ll pour it into the holes you drilled. Then you just wait 24-48 and the magic happens.
Here’s how you do it:
Tools Needed
- Dexpan Expansive Grout (Amazon link) – This is the compound that you will mix to cause the rock to break. Couple things to note when buying this:
- It comes in 3 options. These options are based on the temperature of the core of the ROCK. Not the air temperature. Obviously, it’s difficult to determine this, but I did this during the fall when our seasons were changing and just assume the rock was going to be cooler than the outside temp since most of it was covered by dirt. Buying the incorrect grout for the temperature will cause the mix to dry slowly or very quickly.
- An 11 lbs container is enough to fill 9.5 feet of 1.5″ diameter holes. If you decided to use 1″ holes (like I did) then this container will get you 12.6 feet of use.
- SDS Hammer Drill – The reason I put this as a requirement is you will need to drill holes that are AT LEAST 1″ in diameter. Dexpan recommends 1.5″, though I was able to get by with 1″. I did not own an SDS Drill before this project. I was planning to rent one from Home Depot. My local HD charged $100 for a 24 hour rental. That’s when I found the SDS Drill from Bauer (Amazon link). If you have a Harbor Freight nearby, you can pick it up from them for a little less. They also have plenty of reviews (found here). I was a bit skeptical of this drill due to the name brand, but I’ve been SUPER impressed. I really like it. It slices thru the rock perfectly! Now I have a SDS Drill for less than what I could have rented one for.
- SDS Masonry Bit (Amazon link) – If you are using an SDS drill, you’ll need to make sure you are using an SDS bit. This is a 1″ bit that does a great job.
- Pry Bar (Amazon link)
- 3lbs Sledge Hammer (Amazon link)
- Gloves
- Safety Glasses
Process
My recommendation is to drill all of your holes before buying your Dexpan. You will 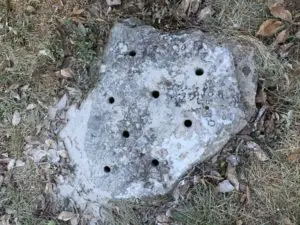 want to space the holes apart by approximately 8″ (I recommend 6″ spacing if you drill 1″ holes).
Using the SDS drill and bit that I recommended above, it took me about 6-8 minutes to drill each hole 6″ to 10″ deep. I recommend taking breaks if this is the first time you’ve used an SDS drill as the vibration can take some getting use to.
Once you have your holes drilled, it’s important to let them cool over night. Otherwise, if you pour the Dexpan mix into holes that are too warm, it could cause the compound to dry too quickly and cause a blowout.
The other advantage to drilling your holes before buying the compound is that you can measure the depth of your holes to determine exactly how much mix you need. An 11 lbs bag of Dexpan will fill 9.5 linear feet assuming 1.5″ holes. If you only drill 1″ hole, the 11lbs container will get you 33% more coverage which comes out to about 12.6 linear feet.
If you are going to need more than the 11 lbs bag, they do offer it in 44 lbs boxes if you have several holes. This is 4x the size of the smaller container and comes out a bit cheaper per lbs.
Once your holes are drilled, you’ll want to clean them out. I recommend blowing some air into them using an air compressor if you have one. You can also use a shop vac. I would NOT recommend spraying water into the holes. I did this and I had trouble getting all the water out which can cause issues with your mixing.
Once these steps are complete, you can mix your compound. The directions state that you should mix 0.4 gallons of water per 11 lbs container. I found mixing it in a small container and then using a paint mixer on my drill helped get the grout mixed very well.
A couple of points to keep in mind during the mixing process. The mix will be a bit running. It will take the consistency of a melted chocolate milkshake. This is normal though.
Once you have the Dexpan mixed, you can begin pouring it into the holes you drilled. It’s likely that once you have pour all of the mixed compound in the holes, that you’ll see thick compound left in your container. I ended up scraping this out of the container and dropping small amounts into each hole. You’ll want to make sure you have gloves on if you do this.
Once you have all the holes filled with the compound, you work is done for a couple days. I highly recommend covering the holes with a tarp or something if there is rain expected in your area within 48 hours of mixing the Dexpan. If additional water gets into the holes, it could extend the amount of time it takes for the Dexpan to dry.
Waiting Game
There’s not much to do after you’ve finished filling the holes. I didn’t see any change happen until 24 hours after I had poured the compound into the holes. I checked the 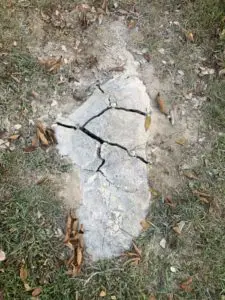 rocks about 12 hours after pouring and nothing had happened. I admit, I was a little concerned, but I forced myself to be patient. At the 24 hour mark, there was noticeable cracks in the rocks.
I decided to wait an additional 24 hours to see if anything would happen, and I’m so glad I did. At the 48 hour mark, there was a significant change in the cracks. The had really opened up and provided significant space that allowed me to get the crowbar in them to pry them apart.
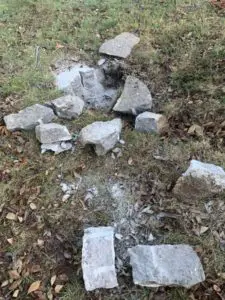
The surprise that I ran into with this particular rock is that the Dexpan had done me a favor and broken it into layers so that it was even easier to remove.
When I began this project, I was hoping to get enough of the rock removed from the surface that it would no longer hit my mower blades. I never expected to be able to remove the ENTIRE rock from the ground. However, that’s exactly what happened once I started prying the broken rocks apart. As you can see in the picture below, I was left with a very large hole. I ended up having to pick up a load of dirt to fill in the hole.
It doesn’t happen often that a project exceeds my expectations like the Dexpan did. I highly recommend it if you have a rock that you need to have removed.
Feel free to comment below if you have any questions or other tips for removing rocks from your yard!