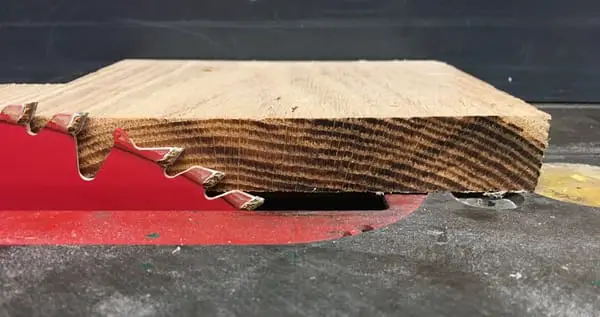
When you’re trying to get the perfect cut for your project, wood burns can be extremely frustrating. Wood burns are common occurrences with table saw use, but they are also an easy problem to solve. In this article, we will look into what wood burns are caused by and how to avoid creating them.
What Causes Wood Burns?
Wood burns come from friction. This friction can be caused by a variety of problems. These problems stem from either user error or machine error, and each one has a fairly simple solution. Luckily, we have a simple list of possible errors to look into to help you find the current problem and prevent future wood burns at the same time.
Your Blade May Be Dull or Dirty
One of the most common causes for wood burns is a dull blade. When blades are dull, their teeth wear down and they cannot cut wood as smoothly as they are meant to. Extra pressure then has to be administered to allow the blade to cut. This extra pressure creates friction, 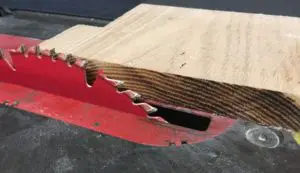 which we already know causes burning of the wood.
It is important to check your blade before you replace it. Your blade may simply be dirty. Dirty blades carry a build up of excess junk in between their teeth. This causes the saw to have a harder time cutting, just as a dull blade would. However, if your blade is simply dirty you can clean it with a high quality blade brush instead of replacing it.
I recently wrote an article on some of the options available for you to sharpen your table saw blades rather than having to purchase new ones. You can check that article out here.
You May Be Using The Wrong Blade For The Task
Different types of table saw blades exist for a reason. Steel blades work for many projects, but if you try to use them while working with harder woods like cherry, mahogany, or maple, you will more than likely be left with burn marks. When working with harder woods, you may want to consider a carbide blade.
It is also important to pay attention to the number of teeth a saw blade has, the shape of its teeth, and the amount of space it has between its teeth. Certain designs work better for ripping and others work better for cross-cutting. There are many styles of blades available to purchase. If you are using a blade with the wrong style of teeth, wood burning is a likely possibility. Because of this, it is a good idea to research blade types before you start a new type of project.
Your Cutting Techniques May Need Revision
In many woods, especially softer woods like cedar or pine, burn marks commonly appear when the wood moves too slowly through the saw. This is because the woods burn quickly, so if they spend too much time in one area they can be burned. Softwoods need to be moved through the saw in very quick motions.
Aside from moving too slowly, burn marks can also appear from uneven movements. Wood needs to go through a table saw in one swift, continuous motion. This means that if you stop to adjust your hand position on the wood, you could be causing the burning. It is easy to tell if this is the cause of your burns, because they will just be in small spots instead of being continuous along the entire cut.
Your Saw May Need A Tune Up
If you have ruled out user error and ensured that you are using the best blade for your specific job, your saw may simply be in need of a tune up. There are many moving parts on a table saw, and just about any one of them being out of alignment can cause burn marks on your wood. This is again caused by friction, since parts being out of alignment can cause things to rub together or it can cause extra pressure to be needed while cutting.
Splitter
The first part to check during your table saw tune up is your splitter. You will want to begin by making sure that you are using a high quality splitter. If not, you will want to purchase one. Next, you will need to check that it is properly aligned. The splitter should be parallel with the fence and it should sit at a ninety degree angle to the table.
Blade
Next, you will need to check that the blade is aligned correctly. When checking the blade, you should find that it is parallel to the fence. If it is not, it could be causing the wood burns. You may also want to make sure your blade is not bent or warped. If it is, it could be causing the 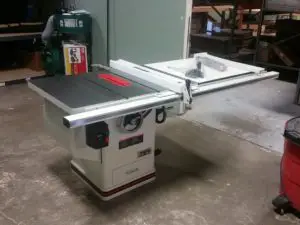 burning and it is also a safety concern, so the blade should be replaced immediately and the saw should not be used until a new blade is installed.
The height of your blade could be causing your burns too, especially if you are working with hardwoods. This is because a lower blade creates more pressure against the wood, and therefore causes more friction. It also causes the wood to move through the saw at a slower speed. Hardwoods already move through the saw at slower speeds, which causes them to burn even more. However, be sure to know that higher blades can cause a greater risk for kickbacks. Kickbacks can be dangerous for the user of the table saw.
Which Piece Is Out Of Alignment?
If you are having trouble figuring out which part of your saw is causing your wood to burn even after checking the alignment, look to see where the wood is burning. If it is burning on the side of the board that is closest to the fence, for example, the blade and the fence may not be parallel. You may be able to tell a lot from looking at the location of your burns.
Your Saw May Need More Power
There are many table saws on the market today. Some are more powerful than others. If you have a table saw that is less powerful, you may not be able to cut a thick piece of hardwood as easily as you could with a more powerful saw. If your saw is not strong enough to cut the wood that you are working with, you will often see burn marks on the wood.
How Can I Remove Wood Burns?
Wood burns are not easily removed. The best way to ensure your work is free of wood burns is to prevent them from happening in the first place. However, as a woodworker, you know that sometimes burns happen regardless of how hard we work to prevent them. Sometimes, wood burns may not cause an issue for the specific item that you are working to create. FOr example, if you are painting your piece you may not need to worry about any burn marks that happen to appear. However, there are plenty of times when you will want your work to be burn-free. If you do need to remove burns from your work, you can try two methods for removal.
Sandpaper
If the burn is light and seems to be near the surface of the wood, your best option for removal is probably sandpaper. With sandpaper, you can simply sand off the area of the wood that has been burned. This will allow the burn to be removed while keeping your project looking just as you wanted it to.
Scraper
If the burn is deeper than something sandpaper would be able to remove, you may need to try a scraper. Scrapers have a curved, sharp edge that is made to remove the top layer of wood. This will allow you to remove burns, but it may affect the end result of your project at the same time. With a scraper, you will want to decide if you would prefer seeing burn marks or textural differences in your finished piece. You can pick up a pack of scrapers like this one that I use on Amazon for less than $15. I find them very handy to keep around the shop.
Final Thoughts
When you are working on a table saw project and begin to see burn marks, remember to check for the common causes. First, check your blade. Most wood burning incidents are caused by a dirty or dull blade. Next, make sure that you are cutting with a quick, continuous motions. If you are still seeing burn marks, try giving your saw a tune up. Make sure that the blade, splitter, and fence are all aligned exactly how they are meant to be. Ensure that you are using the correct blade for your specific type of wood during your project. If you follow each of these tips, you should be able to avoid table saw wood burns completely.