Wood carving and its varieties are some of the oldest forms of woodworking. Even though it has been a hobby practiced for thousands of years, the methods and technology have remained relatively the same. It’d still a highly popular form of art that continues to grow.
Though it may look intimidating when you first begin researching it, wood carving is not that overly difficult if you are willing to learn the different tools and techniques. Any new hobby takes patience, practice and persistence. Wood carving is no different. The nice thing about this hobby is that you can get started with a beginner setup for around $125.
How long has Wood Carving been around?
It is estimated that wood carving has been around for thousands of years. The oldest know carved wooden sculpture, called the Shigir Idol, was found in 1894 in Russia. Through recent scientific date testing, the sculpture is thought to be more than 11,500 years old. This time frame would indicate it was created near the end of the last Ice Age.
Another example of early records describing wood carving occurs in the Bible. It occurs in the book of Exodus when God speaks to Moses and describes Bezalel as being a master craftsman who is “…skilled in engraving and mounting gemstones and in carving wood.” It is believed that Exodus was written around 5 BC.
Is Whittling and Wood Carving the same?
It is common for people to assume that these two forms of woodworking are the same. I’ll go into more detail below, but the correct answer is no, they are not the same. I view whittling as a child of wood carving. There are 4 types of wood carving that you can learn. Whittling is one of these types as you’ll see below.
What are the Primary Types of Wood Carving?
There are two variables that determine which type of wood carving a project falls into. Those variables are 1) the tools required and 2) the final form of the created piece.
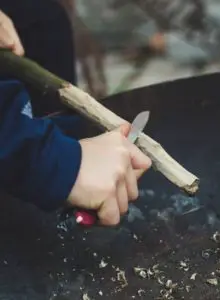
- Whittling – Whittling is the oldest form of wood carving. The only tool that is needed to start whittling is a knife. There are a couple different options when choosing a knife. One option is a fixed handle, and the other is a folding knife which is similar to how a pocket knife works. For a more detailed article on the differences between carving and whittling, check out my article here.
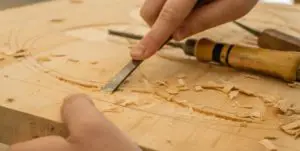
- Chip Carving – This is one of the most popular forms of wood carving for beginners. It involves removing the surface of the wood you are using and cutting down into the wood to create different textures and patterns. This form of carving can become very difficult based on the patterns you are trying to create.
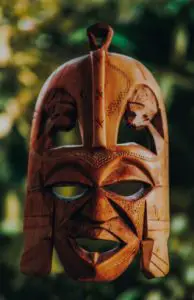
- Carving in the round – This form of carving produces a 3D form of a sculpture. A carving of an animal or some other type of caricature is popular. There is an endless amount of carving tools available for purchase in this area. In addition to knives, carvers also have various gouges, chisels and other hand tools to create various cuts.
- Relief Carving – A relief carving is a sculpture that rests against a flat background. The carver uses the texture and carving of the subject to create depth and perception of the piece. It’s common for these pieces of work to hang on a wall. The tools that a carver will need for this type of work include knives, gouges, and chisels.
What type of Wood should I use?
The most common species of wood for those just getting started in wood carving are: basswood, butternut, pine and balsa. These are popular for beginners because they are softer woods and allow new carvers to learn how to operate their knives. Other woods that are usable for more experienced carvers can include walnut and oak. These two woods are much harder material, thus making carving a bit more challenging. I would recommend using basswood as your wood of choice for your first few projects.
Over average, you can expect to pay about $3-$5 per board foot for these woods. Walnut will probably run a bit higher and could go as high as $10 a board foot depending on your location and the quality of the wood.
What tools are needed for wood carving?
Below is a list of tools that I think a wood carver should have in their shop. There is a wide range of tools available on the market. Take your time and learn the tools slowly before buying many tools that may sit in the corner and never get used. For a detailed list of all the tools needed to get you started carving (and for less than $140), please see my recommended items here.
Cutting Tools
There are hundreds of options on the market. This is just my suggested list of some of the ones you may want to pick up over time. This is not a list for a beginner. If you are looking for beginner tools, please scroll down and see that section as the list is much shorter.
- Knife sizes: #7, #9, and #12
- Gouges: 5mm and 10mm
- Skews size: 8mm
- Veiner size: 3mm
- V Tool size: 6mm

Sharpening Tools
- There is a wide variety of sharpening stones available online. I would recommend getting at least a couple different grit stones. Much like sandpaper, this will let you start at a courser grit and work your way to a finer grit for finishing.
- I would also choose a sharpening stone that does not use oil as a lubricant due to the how difficult it is to clean up.
Safety Equipment
- A quality pair of cut resistant gloves to protect your hands from ill guided blades. Cut resistant gloves will prevent the blade from penetrating thru them and slicing open your hand.
- Eye protection – though the wood shavings and chips may be small, it is important to protect your eyes from them. Even the most basic pair of safety googles, or glasses are better than wearing nothing at all.
Beginner Needs
As exciting as it is go purchase new tools for your shop, I recommend NOT going this route when you are just learning to carve. The most important steps early on are to learn how to use your tools. Just starting out with a carving knife and getting a feel for how it works with the wood is the most important thing you can learn on your first couple of projects. On top of the actual carving process, it’s also important that you learn to sharpen each of your tools.
- Carving Tools:
- The first tool you purchase should be a carving knife. These are readily available and can be found at most craft or woodworking stores.
- I HIGHLY recommend starting with a fixed handled knife. These are much safer for beginners because the blade is fixed and won’t accidentally close under pressure.
- After you’ve had some practice with a knife and tried it on a few different pieces of wood, I would recommend purchasing a beginner’s wood carving set. These sets will typically have a range of different gouges, chisels and knives included in them. This will allow you to gain experience on how these tools operate. You’ll also find that you will develop favorites that you go to as often as you can. There will also be some tools that you rarely touch. This will help you decide what tools you should invest in once you progress in your carving skills.
- The first tool you purchase should be a carving knife. These are readily available and can be found at most craft or woodworking stores.
- Sharpening Equipment
- I would recommend starting out with a very basic combination sanding stone. A combination stone can be found in both a medium and fine grit.
- Another tool that I would suggest is a 30-power jeweler’s loupe. As a beginner it can be frustrating when you sharpen your tools because you don’t know if you are making any progress. A jeweler’s loupe will help you get a close look at your blade. Look at new blades before they’ve been used so you can get an idea of what a sharpened blade should look like.
- Safety Equipment
- All beginner carvers should invest in a pair of safety goggles and cut resistant gloves. The gloves can protect you from an emergency room visit due to cutting your hands and fingers.
What can I make as a wood carver?
As a beginner, I would recommend your first project be carving a cube using only a knife. I know it doesn’t sound exciting but taking a wood blank and carving it into as close to a perfect square as you can, will be great practice. It will also give you experience working with the grains on each side of the wood. Once you get it cut, keep it! Let this be a visible measuring stick that you can look at to see how you’ve progressed as you move forward.
You will find a wide range of patterns available online. It is important to take your time and progress slowly. Don’t choose an advanced design to create if you have only created a couple of sculptures as you will likely become frustrated. Lastly, don’t allow yourself to imagine a detailed end product while you are working on your project. This can lead to frustration for a beginner because it’s likely your end product won’t look as nice as what you imagined in your mind as you were carving it. With practice though, you’ll be well on your way to design amazing pieces that you will be proud to show off!