Woodturning has been around since the ancient Egyptians perfected the technique sometime around the 7th century B.C. The introduction of resin into the process took place much later, in the 20th century A.D. As the technology in both adhesives and resins improved, this notable addition to the process allowed skilled woodworkers to produce stunning multicolored pieces in a variety of shapes and sizes.
This guide will investigate the practice of woodturning with resin, from simple mechanics to tools of the trade and our suggestions to boot.
Let’s start with the basics.
Key Differences with Traditional Woodturning
Traditional woodturning involves a method of spinning a piece of wood, usually on a lathe, and shaping the wood with a myriad of shaping tools, including:
- Bowl, Spindle and Roughing Gouges
- Round Noses
- Parting Tools
- Skew Chisels
- Scrapers
- Other sharp things your somewhat careless male relatives mounted on a grip and “always used” to shape turning wood
- Sanding Tools of Varying Grits/Styles
- Finishing Stains, Polyesters, Sealers, etc.
Said tool(s) are used to cut the spinning wood to shape or insert ridges. In a nutshell this is woodturning. So, what of this resin thing?
Well, to put it simply, the process is very similar but the media involved is notably different and requires a couple additional tools:
- Resin (obviously)
- Coloring Agent(s) (if so desired)
- Casting Mold(s)
- Sealing agents, like caulk, for custom made molds
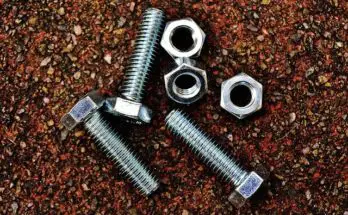
- Chucks/Adapters for your Lathe
- Vacuum Chamber or Pressure Pot
You see, instead of turning a single piece of wood, you could turn:
- Resin only
- Resin with a wood piece or pieces in it
- Wood sealed/joined with resin
The key differences between traditional woodturning are primarily in the preparation and finishing of the media. Many of the woodturning techniques experienced woodworkers have learned will transfer nicely to working with resin with a little bit of practice.
As mentioned in the list above, the use of casting molds is key when woodturning with resin. You see, instead of taking a chunk of wood and shaping it down, you first need to take the liquid form of the resin and give yourself a base form to shape.

So, you could use a myriad of household items or specific casting molds that are available from most every product channel one might purchase from to first form the resin into a base shape ready for turning. Or, you can create your own mold using MDF, Plywood or anything else that could be cut and sealed. This is a key point when creating your own molds we will explore in more detail later in the article.
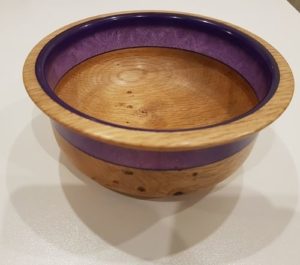
It is at this step that other media, including wood, can be added to the form with resin. As an example, if you have seen any of the bowls or pens or really colorful widgets—or even exotic tables that seemingly have a modified tree trunk as a surface—every project started out as media with liquid resin in a mold that cured for days before being introduced to a lathe or other shaping tools.
In the truest possible way, there are endless possibilities for your projects with the addition of resin. But, there are key things that can happen with resin that don’t necessarily happen when turning wood…
What can go wrong?
Lathe speed coupled with tool pressure can dramatically impact your result. Simply put, if you apply too much force to the resin, you can melt it. On the contrary, if you turn too slowly, you can inadvertently cut chunks of resin off of your piece even with nominal pressure.
Like any new skill, woodturning with resin is something you should try with a scrap project before attempting a formal project. We will address the best known approaches for this rewarding skill as we go. For now, though, let’s turn our attention to resin. There are some key considerations to discuss.
Types of Resin for Woodturning
There are numerous types (and sub-types for that matter) of resins on the market, but for this article we will primarily cover three types of resin for this application:
- Epoxy
- Polyester
- Polyurethane
Each one has different characteristics that should be considered for your project. Again, we must suggest that any product you have not used should be tested. This cannot be understated!
Epoxy Resin
Epoxy is an adhesive that is used for both hobby projects and much bigger applications, like boat hulls, flooring, aerospace, electronics, wastewater storage facilities and lots of other construction applications as well. Epoxy is almost assuredly present all around you as you read this, both in your computer or device and wherever you are sitting or standing. The key in each of these applications is how epoxy actually works.
You see, epoxy by itself is a resin—oftentimes, a liquid polymer—but some are solid. It is a thermosetting agent—meaning that it cures depending on its surrounding temperature. If you were to pour liquid epoxy onto a table, for example, it likely would remain in its viscous state persistently as it is pretty stable at room temperature.
The key to affect epoxy’s temperature enough to make it into an adhesive is to create a chemical reaction by introducing a hardening agent with the epoxy. The hardening agent is key here, because it helps determine the outcome of the chemical reaction. Remember the myriad of applications for epoxy we mentioned a moment ago? The epoxy in each of those applications was likely one of three basic types:
- Bisphenol A
- Bisphenol F
- Novolac
There are other types, but these three epoxies are the most common you’ll find. The hardeners then fall into five primary groups:
- Amines – These are the earliest catalysts used with resin, creating extremely diverse applications;
- Mercaptans – Used for automotive, construction and DIY applications. Mercaptans bond to metal, wood and concrete with rapid cure speeds
- Sulfones – Usually solid at room temperature, these catalysts require heat to be used. Sulfones are most commonly used as adhesives or coatings for electronics or aerospace applications
- Cycloaliphatics – Designed to be UV and high temperature resistant, these catalysts are used for outdoor solvent-based coatings
- Polyamides – Cure at room temperature, but are sensitive to temperature fluctuations. Can lose strength and insulation value with wide swings in temperature.
We’ve done a deep dive here to show you the extreme diversity present when it comes to epoxy and its hardeners. See, your end result will always depend on the hardener you use. Some hardeners are clear, but many are not. If you are looking for transparency, be very aware of the hardener you use. Further, consider the environment and wear and tear your project may need to have resistance to as you choose your products.
Lastly, Epoxy has the stigma of being unable to buff to a shiny state. In order to get a shiny epoxy piece, you either need to add more resin or use another product, like a gloss sealer.
East Coast Resin makes a great product that is better priced than many of the other polyurethane resins that you’ll fine available. Here’s a link to their gallon sized set on Amazon.
Polyester Resin
Before we get into the nuts and bolts of polyester, let’s get one thing really clear: it smells awful and must be used in a well-ventilated area. Many polyester products are carcinogenic if inhaled. Please be aware of this before you choose to work with this media; if you are going to attempt to use polyester for a project, you must take proper precautions.
Polyester resin is less strong than epoxy, but it’s also less expensive. Well, let’s be clear here. There are two primary types of polyester resins:
- Orthophthalic – Most commonly used resins for hobby and light commercial use;
- Isophthalic: – This type of resin has become the go-to material in the marine construction industry due to its uncanny resistance to moisture
Within these two big buckets are a whole range of varying resins. All of them, like epoxy, are thermoset, meaning they require a catalyst in order to increase their temperature enough to cure.
On this topic, one big area where polyester differs from epoxy is that the raw resin will “gel” over time on its own. Some manufacturers will mix in an inhibitor in order to reduce this tendency, but beware of the risk
inherent in this media.
If we go back to the start of this part of the discussion, the resin you are most commonly going to be using will be derived from the first bulleted item. Orthophthalic resins are the most economical and widely used. It has a tendency to be more brittle than epoxy, but this depends heavily on the agents the resin is combined with.
In general, beyond the smell, polyester resin is a wonderful choice for woodturning projects. As we mentioned previously, polyester is thermoset. As such, it requires the following to rapidly cure to a solid state:
- Catalyst: Used to create the necessary chemical reactions for the resin to cure;
- Accelerator: Speeds up the curing process at room temperature. Sometimes, accelerators are added to the resin by the manufacturer. There are other potential additives that may be combined with the resin by the manufacturer to both inhibit premature gelling and also fire resistance. For our purposes, we’ve already jumped clear down the polyester rabbit hole, so I’ll spare you those details.
There are two major key differences polyester has with epoxy that we’ve not yet mentioned:
- It can be buffed to a shiny finish
- Some (many) polyesters are not UV resistant and can yellow over time with exposure to the sun.
Polyurethane Resin
Well, if you’ve been working with wood for a while, you probably have experience with at least one form of this incredibly versatile material. Indeed, the resin you might use for woodturning is but one derivative related to the sealer you used on your last project.
Indeed, polyurethane is used pretty much anywhere you might imagine. This guide will focus intently on the resin form of polyurethane as it’s plain ridiculous to discuss all the other potential uses.
Polyurethane resins for casting are thermoset, like both epoxy and polyester. Polyester requires the use of a hardener, which serves the same function as the combining agents for both epoxy and polyester. Polyurethane has a couple unique characteristics you should be aware of. Note for this part of the discussion that these are broad-brush tendencies that not all products may display.

First, the amount of time you have to work with your mixed up polyurethane is relatively tiny as compared with both epoxy and polyester.
Natively, most polyurethane will begin to cure in the three to six minute range. This differs from the hours of working time one has with epoxy or the fourteen to sixteen minutes you have with polyester. Again, there are some really crafty companies out there that use fun chemistry to improve this, but these are baseline tendencies for each type of resin we researched.
Second, polyurethane has a tendency to be really bubbly and thus require the use of a vacuum chamber or pressure pot for your projects. We’ll get into these fun new toys you never knew you needed in the next section. Again, though, this is not true of every product you may use.
It is a tendency of polyurethane at a basic level—but you may have some polyesters or epoxies that no matter what you do, fill up with bubbles. This is not likely, but absolutely possible.
Third, some polyurethanes are very sensitive to water—so you can’t mix them with wood stir sticks. This brings up a final point we’d like to make about polyurethane, and it is this: polyurethane has a tendency to not cure too well in humid environments. Ready the first part of that first sentence again, intrepid woodworker, and I think you’ll see the logic there.
I’ve had great success with this particular brand of resin in the past. No matter what type of resin you pick up, make sure you grab some disposable cups like these with the measurements on the side to mix the product in. It will make life much easier during the mixing process.
Now is a good time to talk tooling. Ready your credit cards, kids.
Further Tooling Considerations
As you begin your journey into woodturning with resin, please understand there are a couple basic things you’ll need that we alluded to in other parts of the guide.
- Mixing Cups
- Various types of stir sticks, dependent on the media used
- Releasing Agent
- Foam and/or particle board and/or silicone and/or miscellaneous basic items for molds (bowls, cups, blanks, etc.)
Vacuum Chambers, Pressure Pots and the Great Beyond…
The key question of “Do I need one?” inevitably is running through your mind at this point as your hand reaches for your wallet.
As in every angle of the woodworking discipline, there are certain circumstances where having a tool makes an end result better. Take a drill press as one example; do you need a drill press to drill a hole? Nope, you don’t—both hand-powered and power drills alike do just fine. Thing is, what if you have to line up ten holes perfectly even? Hand drill sound good to you? We like our chances with a drill, but for perfection, a drill press is preferred every time.
For resin, how you pour it into a cast or mold impacts the presence of bubbles as much as the way the product sets up in its new home. How warm both your resin and your mold are can also impact the amount of bubbles present in your resin.
You can even roll the resin around the mold if you have enough space to do so. Finally, you can make use of a vibration source either under or next to your project to help.
You can get creative here, using placement of your curing project in the shop to your advantage. Any power tool generates vibration when it’s on, so this should be relatively easy to see. Or, you could go the less creative way and use a vibrating table for the same effect. Each one of these techniques will help, but is unlikely to completely rid your project of bubbles.
So, some bubbles can be popped with your gloved fingers or knuckles, and others can be popped with a heat gun or butane torch. In bigger projects, you won’t have the option of vacuum chamber or pressure pot, so having a hand-garnished heat source is critical. Regardless, there are certain situations where you simply won’t care if bubbles are in the middle of your project because it’s opaque.
What if it isn’t, though? What if you are working to a glassy, crystal-clear finish—and it’s polyurethane resin?
As we said, in larger projects bubble removal is manual. In smaller projects, you have the benefit of using either a pressure pot or vacuum chamber to remove bubbles. A nice beginner vacuum chamber that works well is this one by Yaetek.
The pressure pot uses pressure to compress air bubbles down to a microscopic size. You have to allow your project to fully cure in the pressure pot. Bear in mind that the air isn’t gone—it’s just tinier. If you prematurely release the pressure, your bubbles will return as they were.
A vacuum chamber removes all the air in it. If your project is quick-curing, this could be a problem as it may cure so fast that the vacuum couldn’t extract all the air. Bear this in mind as you choose your resin! As in the pressure pot, your project will remain in the vacuum chamber as it cures.
An additional point too is that the only thing that will remove air from non-solid items is a vacuum chamber. So, if you are making silicone molds or floppy polyurethane dongles, you will need a vacuum chamber.
Keep in mind that when you purchase either product, it has an additional dependency. The pressure pot uses a compressor—like one you’d use for a nailer—to create the pressure. This particular model comes with both the pot and the needed compressor to get you started. Conversely, the vacuum chamber needs a vacuum pump, like those used in automotive applications to test A/C pressure. You can find nominally-priced vacuum pumps online without too much trouble.
Do you need either product? Look at your project list and decide!
Curing the Discussion
Throughout this guide, we have explored the ins and outs of woodturning with resin. To reiterate a couple points:
- This is an area of woodworking that is quite literally limitless. Your creativity can run wild and truly make incredible things
- Plan out test projects before you venture into deep water. This takes practice with both tooling and new media to get to a place of comfort.
It has been our pleasure to have this discussion. Please send us pictures of your creations! We would love to see what your inspiration leads you to make.
Be well, adventurous woodworker. It’s time to play.