Hollowing end grain is one of the most relaxing and satisfying processes a woodworker can do. It’s steady, methodical, and pleasantly time-consuming. And the finished project can take on a lot of different forms!
If you’re just starting to learn how to hollow end grain, it’s a good idea to start off with something simple, like a bowl or a cup. This way you can learn the ins and outs of the process without over complicating the process. These seven tips will help you prepare for your first project and master the basics.
1. Learning How To Hollow
Trying to learn how to do anything for the first time can be as frustrating as it is rewarding, and hollowing is no exception. There are a couple of different types and techniques to go through, but hold off on diving too deep into those until you’ve got the basics down. Set reasonable goals for yourself, start simple, and allow yourself to make mistakes early on. These mistakes will be your best teacher.
The best way to learn is by getting your hands dirty. Start off with inexpensive stock that gives you plenty of room to work with. Attempting to make a smaller bowl initially will probably lead to more frustration than learning. Focus on tool control, how the wood reacts and moves, and which tools work best for you.
After you’ve got a couple of splinters, head on over to YouTube and learn from those who are more experienced in hollowing. You can find an abundance of videos by hollowing equipment manufacturers and experienced wood turners, both of which will be extremely beneficial to your learning journey. Just make sure that the videos you’re learning from are by seasoned professionals and not just some person with a camera.
2. Staying Safe
It might be the least fun aspect of wood hollowing, but it’s easily the most important. The key to remaining safe while hollowing end grain is to know the limits of yourself and your tools. Using tools in ways that they aren’t meant to be used can cause them to become damaged or even break, putting you in danger and potentially messing up your stock.
 One of the most common mistakes that new wood-turners make is overextending their arms and tools past the tool rest. Overextending yourself will make it difficult to maintain your balance, which can lead to slips. Make sure that you’re using a high-quality tool rest to get the job done as well. A tool rest that wobbles or mounts improperly will put your hands and your project at risk.
Another common issue among first-time hollowers is that they use the wrong length of tool for the job. You want each tool you use during the hollowing process to be balanced carefully across the tool rest. Using a longer tool when you’re just starting will put too much of the tool on your side, while using a shorter tool after you’ve hollowed most of the inside will put your hands too close to the wood.
3. Picking Your Hollowing Tools
Your tool selection will be determined by the kind of wood you’re using, the orientation, and the depth you’re hollowing at. There are a couple of different ways to go about hollowing end grain, and each will call for different tools. You’ll develop a preference for different techniques as you go, and figure out exactly which tools you need to create the perfect bowl.
That said, there are a few basics that you’ll need to get started. A drill, a set of scrapers, and a set of cutters should cover you for any kind of hollowing project. Whether or not you decide to use a cutter or a scraper will depend on your preference. If you’re just starting out, try each on your first few attempts, and see which one suits you better.
If you don’t have any of these tools on hand, don’t worry! Odds you probably have something nearby that you can use. Believe it or not, wood hollowing used to just be done with tools the carpenters had laying around. Scrapers and cutters certainly make the job easier though!
A pair of scrapers that I picked up that have worked really well are this set by Hurricane Cutting Tools. The steel on these scrapers has held up great. They are really nice quality for the price. Handles are also well made and comfortable.
4. Using Drills
While some carpenters may see using a drill as “cheating”, the truth is it’s an easier and faster way to get your hollowing project underway. Using a drill to place the initial hole in your bowl will save you a lot of time and energy. Grab your favorite drill bit, place a piece of tape on it to mark your desired depth, and drill a small opening in the center of your end piece.
Doing this also makes it easier to place the bottom of your bowl. Rather than having to eyeball and measure as you go, you can create the bottom point right at the start. This way you won’t have to stress over going too far as you hollow out the rest of the bowl.
Once you’ve got a bit of experience in the end grain hollowing department, you can try hollowing without a drill to see how you like it compared to with a drill. But unless you’re a passionate purist, there’s no real reason not to use one. It speeds up the hollowing process, making it a more enjoyable project.
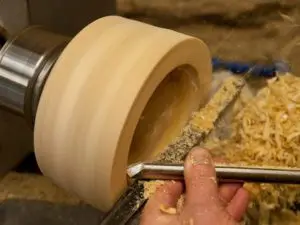
5. Using Cutters
Cutters are the tools you will use for the majority of the hollowing process. They can be straight or curved. Straight cutters are used for boring the initial hole and clearing debris, while curved cutters help remove the rest of your bowl. Cutters come in a variety of shapes and sizes, and which ones you end up using will depend on your project and skill level.
 While it can be tempting to get specialty cutters designed for specific wood turning needs, you’ll be better off starting with simpler cutters. These will help you learn the basics without over complicating things. Plus, you’ll develop preferences and style along the way, which will inform you of which (if any) specialty cutters to get. You’ll also learn how things like orientation and the kind of wood you’re using affect the cutters you need.
Green wood and dry wood, in particular, will require specialty cutters to work with. Hook cutters are generally well suited to working with green wood, but they can be difficult to handle, especially for beginners. Before getting too complicated, however, learn what you like and what you need by using the simplest of cutters.
Here’s a great beginner set of cutters specifically for bowl turning. This is also made by Hurricane Cutting.
6. Finishing The Inside Surface
While it won’t be seen as often as the outside, the inside surface of your hollowed out grain is exceedingly important. Whether you’re creating a bowl, cup, goblet, or box, people will see and feel the inside of the box. It needs to be sanded to a smooth and pleasant touch, with clean lines and curves. You should also finish the inside the same way you would finish the outside, with varnish or stains to achieve a pleasant look and feel.
When dealing with a deeper opening, however, the rules are a little different. Especially if the opening of your hollow piece is too small to fit a finger through. In these cases, where you can’t really see or feel the inside, there’s no real harm in leaving it unfinished, especially since there isn’t much of a way to finish it.
You can use your wood turner to make the sanding process easier. Be sure to put it on a slow speed, however, and frequently clear out sanded material. This way you aren’t putting your hand in harm’s way or removing too much of the inside surface.
7. Sequence of Hollowing
The steps you take to hollow your end grain, and the order you perform them in, are extremely important. Carpentry is a bit like cooking, in that your success is largely determined by your forethought and careful preparation. The more surface you cut away from your stock, the less stable it will be. Cutting to the very edge of your wall right from the start can compromise the strength of your wood, causing cracks and breaks before you even get close to finishing.
 The best way to avoid this is to steadily open your initial boring from front to back. This way your bowl is the same width all the way through the entire time that you are working on it, and the weakest stage of the project is saved for the very end.
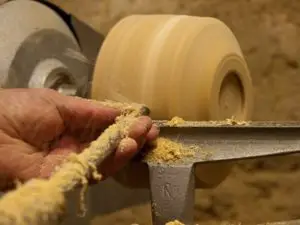
It’s also important that you are removing the wood shavings consistently as you go. They not only make it difficult to see what you are working with but can get in the way of your cutter and the surface. If you’re working with green wood, it’s imperative that it’s kept wet throughout the process. This will minimize warping throughout the process.
Conclusion
Now that you have a better idea of how the hollowing process works, don’t be afraid to give it a go! You can start off simple by using excess wood stock and basic tools. Once you get the hang of it, you’ll be able to work on more complex projects like lidded boxes and drinking goblets!